4. Configuring Eclipse RCP 4.3.1 Kepler
4. Configuring Eclipse RCP 4.3.1 Kepler
Creating your Elastic Path Eclipse Workspace
When you start Eclipse, you will always be prompted to select a workspace. We recommend you create a new workspace (For example, C:\ElasticPath\workspace) to hold all your Elastic Path projects and Eclipse settings when starting development for the first time.
Installing Eclipse Plugins
| Order | Plugin | Version | Update Site |
|---|---|---|---|
| 1 | Eclipse WTP (Web, XML, and Java EE Development) and BIRT (Business Intelligence, Reporting and Charting) | Latest | |
| 2 | Code Analysis Tools and Maven Integration for Eclipse | Latest |
To install a plugin:
- Start Eclipse.
- In Eclipse, choose Help -> Install New Software.
- In the Work with box, enter the plugin's Update Site URL.
- Select the plugin's check box and all the plugin dependencies and click Next.
- Click Next.
- Accept the license agreement, if required, and click Finish.
Setting up your Eclipse Environment
- Download the following files (Right-click and select Save Link As...)
- Elastic Path Eclipse Code Template (ElasticPathCodeTemplates.xml)
- Elastic Path Eclipse Code Format Definition (ElasticPathFormatter.xml)
- In Eclipse, choose Window -> Preferences -> Java -> Code Style -> Code Templates and import ElasticPathCodeTemplates.xml.
- Choose Window -> Preferences -> Java -> Code Style -> Formatter and import ElasticPathFormatter.xml.
- Choose Window -> Preferences -> Java -> Installed JREs.
- Select your JRE and click Edit.
- Set the Default VM Arguments to:
-Xms256m -Xmx1024m -XX:MaxPermSize=512m -Dsun.lang.ClassLoader.allowArraySyntax=true -XX:CompileCommand=exclude,org/apache/velocity/runtime/directive/Foreach,render
- Click Finish.
- Choose Window -> Preferences -> Maven and make sure Hide folders of physically nested modules (experimental) is selected.
- Click OK to complete the changes.
Note: Performance Improvement Suggestion
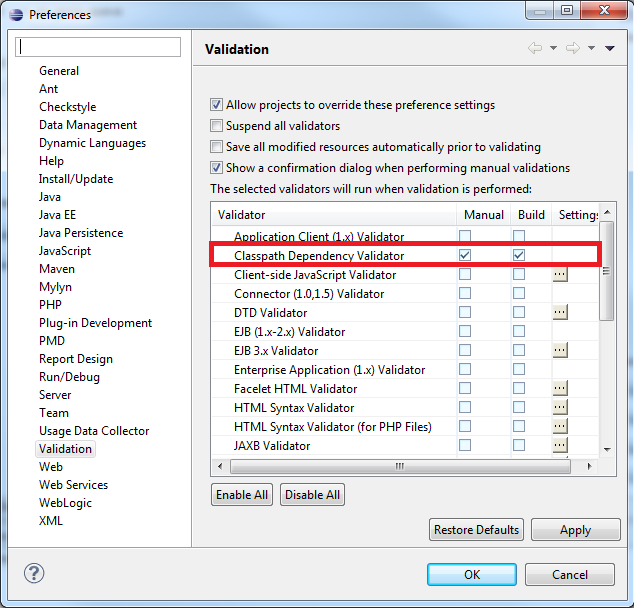
To improve performance, you can disable any unnecessary validation performed by Eclipse. The only Eclipse validator Elastic Path requires is the Class Dependency Validator.
To disable any unnecessary validation:
- In Eclipse, choose Window -> Preferences -> Validation
- Click Disable All
- In the Validator list, select both checkboxes beside Classpath Dependency Validator and click Apply.


