6 - Showing the AutoBill value in the Commerce Manager Client
6 - Showing the AutoBill value in the Commerce Manager Client
To enable customer sales representatives to view whether a customer has opted for the automatic renewal, you'll extend the Commerce Manager Client's Order Editor to display additional order information.
Before you start this section of the tutorial, make sure your Commerce Manager Client is imported into Eclipse and runnable as described in Running the Commerce Manager.
Creating a Commerce Manager Client plugin
The Commerce Manager Client is composed of many plugins that each contribute functionality. To extend the Commerce Manager Client, instead of creating an extension project, you create a new plugin that holds the functionality you want to add.
To create a Commerce Manager Client plugin:
- In Eclipse, go to File->New->Project...
- Select Plug-in Development->Plug-in Project and click Next.
- Set the Project name to com.extensions.cmclient.order, point the Location to your extensions directory and click Next.
- Click Finish.
- In Eclipse's package explorer, open com.extensions.cmclient.order/META-INF/MANIFEST.MF.
- Click the Dependencies tab.
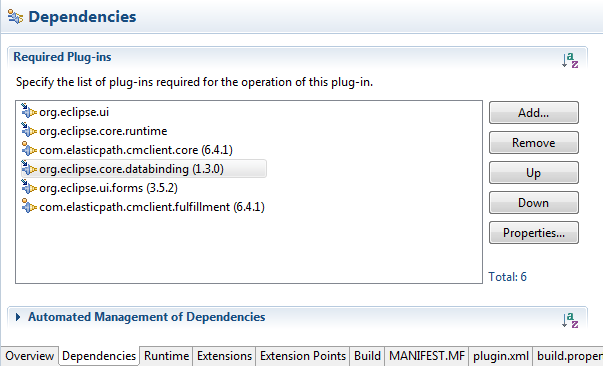
- Add the following plugins to the list of Required Plug-ins:
- com.elasticpath.cmclient.fulfillment
- com.elasticpath.cmclient.core
- org.eclipse.core.databinding
- org.eclipse.ui.forms
- Your Dependencies tab should look like the following:
- Click the MANIFEST.MF tab.
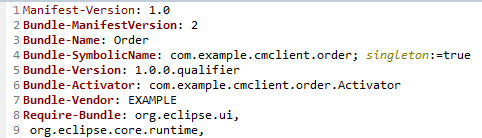
- Beside the Bundle-SymbolicName property, append the following:
; singleton:=true
Extending the Order Editor
The Commerce Manger Client's OrderEditor class provides a multi-page editor that allows Commerce Manager Users to view, edit, and process orders. To display a customer's automatic renewal selection in the OrderEditor, you'll add an additional page to the OrderEditor that reads the autoBill property on the extended order.
Exposing the original Order Editor to extensions
- In Eclipse, open the out of the box com.elasticpath.cmclient.fulfillment project's plugin.xml.
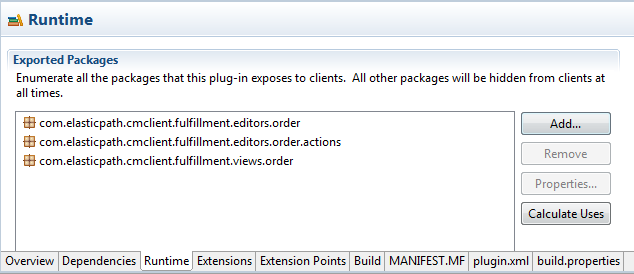
- Click the Runtime tab.
- Add the com.elasticpath.cmclient.fulfillment.editors.order package to the list of Exported Packages.Your Runtime tab should look like the following:
Adding a new Order Editor page
- In the com.extensions.cmclient.order project's com.extensions.cmclient package, create a new package named editor
- In com.extensions.cmclient.editor, create a new class named ExtOrderEditor and add the following code:
CoreTutorial3/com.extensions.cmclient.order/src/main/java/com/extensions/cmclient/editor/ExtOrderEditor.java package com.extensions.cmclient.editor; import com.extensions.cmclient.order.ExtOrderMessages; import org.eclipse.ui.PartInitException; import com.elasticpath.cmclient.core.EpUiException; import com.elasticpath.cmclient.fulfillment.editors.order.OrderEditor; public class ExtOrderEditor extends OrderEditor { /* (non-Javadoc) * @see com.elasticpath.cmclient.fulfillment.editors.order.OrderEditor#addPages() */ @Override protected void addPages() { super.addPages(); try { addPage(new ExtOrderEditorPage(this, "AdditionalPage", ExtOrderMessages.AdditionalPage_Name)); } catch (PartInitException e) { throw new EpUiException(e); } } } - In com.extensions.cmclient.editor, create a new class named ExtOrderEditorPage and add the following code:
CoreTutorial3/com.extensions.cmclient.order/src/main/java/com/extensions/cmclient/editor/ExtOrderEditorPage.java package com.extensions.cmclient.editor; import com.extensions.cmclient.order.ExtOrderMessages; import org.eclipse.jface.action.IToolBarManager; import org.eclipse.ui.forms.IManagedForm; import com.elasticpath.cmclient.core.editors.AbstractCmClientEditorPage; import com.elasticpath.cmclient.core.editors.AbstractCmClientFormEditor; public class ExtOrderEditorPage extends AbstractCmClientEditorPage { public ExtOrderEditorPage(AbstractCmClientFormEditor formEditor, String pageId, String pageName) { super(formEditor, pageId, pageName); } @Override protected void addEditorSections(AbstractCmClientFormEditor editor, IManagedForm managedForm) { ExtOrderEditorSection section = new ExtOrderEditorSection(this, editor); managedForm.addPart(section); } @Override protected void addToolbarActions(IToolBarManager toolBarManager) { // no toolbar actions to add } @Override protected int getFormColumnsCount() { return 1; } @Override protected String getFormTitle() { return ExtOrderMessages.AdditionalInfoPage_Title; } } - In com.extensions.cmclient.editor, create a new class named ExtOrderEditorSection and add the following code:
                     CoreTutorial3/com.extensions.cmclient.order/src/main/java/com/extensions/cmclient/editor/ExtOrderEditorSection.java
package com.extensions.cmclient.editor;

import com.extensions.cmclient.order.ExtOrderMessages;
import com.extensions.domain.order.ExtOrder;

import org.eclipse.core.databinding.DataBindingContext;
import org.eclipse.swt.widgets.Composite;
import org.eclipse.swt.widgets.Text;
import org.eclipse.ui.forms.editor.FormPage;
import org.eclipse.ui.forms.widgets.FormToolkit;

import com.elasticpath.cmclient.core.editors.AbstractCmClientEditorPageSectionPart;
import com.elasticpath.cmclient.core.editors.AbstractCmClientFormEditor;
import com.elasticpath.cmclient.core.ui.framework.CompositeFactory;
import com.elasticpath.cmclient.core.ui.framework.EpControlFactory.EpState;
import com.elasticpath.cmclient.core.ui.framework.IEpLayoutComposite;


public class ExtOrderEditorSection extends
		AbstractCmClientEditorPageSectionPart {

	private Text autoBillText;

	public ExtOrderEditorSection(FormPage formPage, AbstractCmClientFormEditor formEditor) {
		super(formPage, formEditor, 1);
	}

	@Override
	protected void bindControls(DataBindingContext bindingContext) {
		// do nothing
	}

	@Override
	protected void createControls(Composite client, FormToolkit toolkit) {
		IEpLayoutComposite autoBillPane = CompositeFactory.createGridLayoutComposite(client, 2, false);
		// add the new label and text controls to the autoBillPane
		autoBillPane.addLabelBold(ExtOrderMessages.AutoBill, null);
		autoBillText = autoBillPane.addTextField(EpState.READ_ONLY, null);
	}

	@Override
	protected void populateControls() {
		ExtOrder extOrder = (ExtOrder) getModel();
		autoBillText.setText(String.valueOf(extOrder.isAutoBill()));
	}
}
Setting properties for the new Order Editor page
- In the com.extensions.cmclient.order package, create a new class named ExtOrderMessages and add the following code:
                     CoreTutorial3/com.extensions.cmclient.order/src/main/java/com/extensions/cmclient/order/ExtOrderMessages.java
package com.extensions.cmclient.order;

import org.eclipse.osgi.util.NLS;

public class ExtOrderMessages {

	public static String AdditionalPage_Name;

	public static String AdditionalInfoPage_Title;

	public static String AutoBill;

	// messages initialization part
	private static final String BUNDLE_NAME = "com.extensions.cmclient.order.ExtOrderMessages";

	static {
		NLS.initializeMessages(BUNDLE_NAME, ExtOrderMessages.class);
	}
}
This class contains a set of fields that are automatically populated with the values defined in the ExtOrderMessages.properties file. - In com.extensions.cmclient.order, create a file named ExtOrderMessages.properties and add the following properties:
AdditionalPage_Name=Additional Order Information
AdditionalInfoPage_Title=Additional Order Information
AutoBill=Automatically renew and bill on expiry
Wiring in the Extended Order Editor
Before the Commerce Manager Client uses your extended Order Editor plugin, you must disable the original OrderEditor and declare your new OrderEditor in plugin.xml files.
Disabling the original Order Editor
- In Eclipse, open the out of the box com.elasticpath.cmclient.fulfillment project's plugin.xml.
- Click the plugin.xml tab.
- Comment out the the Order Editor's <editor> tag.. The tag looks like this:
<editor
        name="%orderEditor.name"
        icon="icons/order.png"
        class="com.elasticpath.cmclient.fulfillment.editors.order.OrderEditor"
        id="com.elasticpath.cmclient.fulfillment.editors.order.OrderEditor">
</editor>
Enabling the extended Order Editor
- In com.extensions.cmclient.order, create an XML file named plugin.xml.
- In plugin.xml, add the following code:
<?eclipse version="3.2"?>
<plugin>
   <extension
         point="org.eclipse.ui.editors">
      <editor
            class="com.extensions.cmclient.editor.ExtOrderEditor"
            icon="icons/order.png"
            id="com.elasticpath.cmclient.fulfillment.editors.order.OrderEditor"
            name="%extOrderEditor">
      </editor>
   </extension>
</plugin>