2. Configuring Eclipse RCP 4.3.1 Kepler
2. Configuring Eclipse RCP 4.3.1 Kepler
Creating your Elastic Path Eclipse Workspace
When you start Eclipse, you will always be prompted to select a workspace. We recommend you create a new workspace (For example, C:\ElasticPath\workspace) to hold all your Elastic Path projects and Eclipse settings when starting development for the first time.
Installing Eclipse Plugins
You must install all the plugins in the order shown below.
| Order | Plugin | Version | Update Site |
|---|---|---|---|
| 1 | BIRT (Business Intelligence, Reporting and Charting) | Latest | |
| 2 | Elastic Path Supported Eclipse Plugins | Latest | http://repo.elasticpath.com/eclipse/Fall-2014-SP2/update-site/ |
To install a plugin:
- Start Eclipse.
- In Eclipse, choose Help -> Install New Software.
- In the Work with box, enter the plugin's Update Site URL.
- Select the plugin's check box and all the plugin dependencies and click Next.
- Click Next.
- Accept the license agreement, if required, and click Finish.
For more information on the plugins, see Eclipse Plugin Notes.
Setting up your Eclipse Environment
- Download the following files (Right-click and select Save Link As...)
-
- Elastic Path Eclipse Code Template (ElasticPathCodeTemplates.xml)
- Elastic Path Eclipse Code Format Definition (ElasticPathFormatter.xml)
- In Eclipse, choose Window -> Preferences -> Java -> Code Style -> Code Templates and import ElasticPathCodeTemplates.xml.
- Choose Window -> Preferences -> Java -> Code Style -> Formatter and import ElasticPathFormatter.xml.
- Choose Window -> Preferences -> Java -> Installed JREs.
- Select your JRE and click Edit.
- Set the Default VM Arguments to:
-Xms256m -Xmx1024m -XX:MaxPermSize=512m -Dsun.lang.ClassLoader.allowArraySyntax=true -XX:CompileCommand=exclude,org/apache/velocity/runtime/directive/Foreach,render
- Click Finish.
- Choose Window -> Preferences -> Maven and make sure Hide folders of physically nested modules (experimental) is selected.
- Click OK to complete the changes.
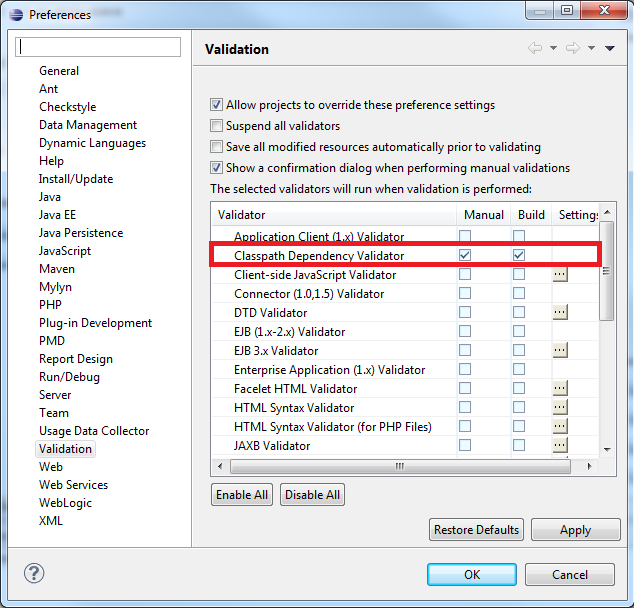
Note:
To improve performance, you can disable any unnecessary validation performed by Eclipse. The only Eclipse validator Elastic Path requires is the Class Dependency Validator.
To disable any unnecessary validation:
- In Eclipse, choose Window -> Preferences -> Validation
- Click Disable All
- In the Validator list, select both checkboxes beside Classpath Dependency Validator and click Apply.