New Dynamic Content
New Dynamic Content
There are many potential scenarios that could require the creation of Dynamic Content. For example, the marketing team is launching a new promotion starting next month and lasting the entire month. It's a general promotion targeting all customers. The graphic design team has been asked to create a banner image for it. This banner image will be displayed on the front page of the storefront.
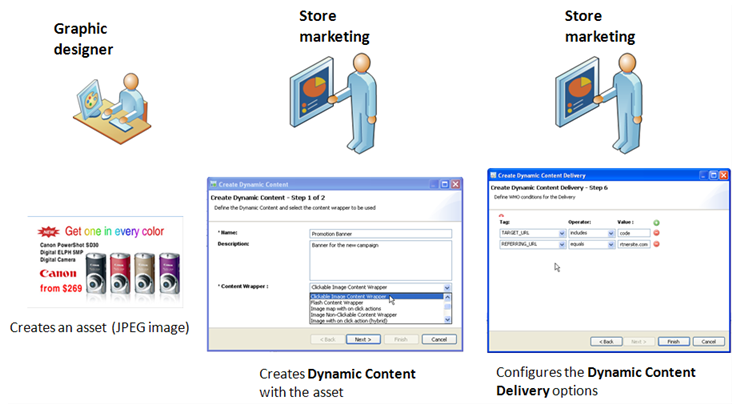
As part of this process, the following steps are taken:
- The graphic designer creates the banner, which is a JPEG image designed to be displayed in a space that is 320 pixels wide and 100 pixels high.
- A member of the marketing team Creating Dynamic Content. He selects the type of dynamic content (the Content Wrappers, which in this case is the Image Non-Clickable Content Wrapper) and sets the imagePath and altText parameters.
- The marketing team member Configuring Dynamic Content Delivery to determine the Content Space where the banner will be displayed, who will see it (everyone), when it will be shown (next month), and in which selling channels to display it (all stores).
Creating Dynamic Content
Marketers can use the Commerce Manager client to create Dynamic Content.
Make sure that:
- Elastic Path Commerce Manager server is running
- You have obtained any assets you need to render the Dynamic Content (images, Flash files, etc.).
To create Dynamic Content:
- Start the CM client and log on as a user with Dynamic Content privileges.
- From the Activity menu, choose Store Marketing.
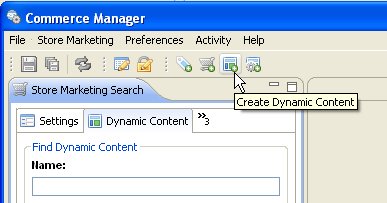
- Click Create Dynamic Content.
- Enter a name and a description. Then select the Content Wrapper for the type of Dynamic Content you are creating.
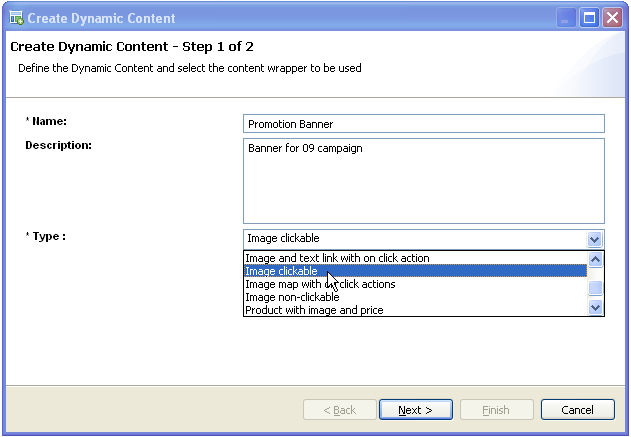
- Click Next.
- Configure the parameters. To modify a parameter, select it and click Edit Parameter Value.
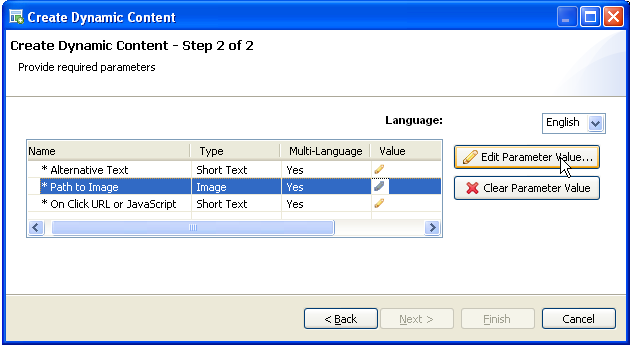
- Note:
- Required parameters are indicated by an asterisk (*) next to their names. You cannot proceed to the next screen until all required parameters are set.
- If a parameter is set as Multi-Language, you can assign different values for each supported language. Use the Language list to select a language. Then set the parameter value.
- If a multi-language parameter is required, you must assign a value for each supported language. If a value is not assigned for a language, the Dynamic Content will not be displayed for that language, even if it meets all the Dynamic Content Delivery conditions.
- Click Finish.
You can now Configuring Dynamic Content Delivery, which will determine who will see it, the selling channels where it will appear, and the timeframe.
Configuring Dynamic Content Delivery
After you've Creating Dynamic Content, you specify the Dynamic Content Delivery options, which will determine who will see it, the selling channels where it will appear, and the timeframe.
Make sure Elastic Path Commerce Manager server is running.
To configure Dynamic Content Delivery:
- Start the CM client and log on as a user with Dynamic Content privileges.
- From the Activity menu, choose Store Marketing.
- Click Create Dynamic Content Delivery.

- Enter a name and a description. Then select the priority level. Note: Using Priority
Multiple Dynamic Content items can be assigned to the same space. The Dynamic Content Delivery options determine which one appears to which user at a given time. Sometimes, conflicts can occur. For example, one Dynamic Content items is set to appear to all users during the entire month of May and another is set to appear to all users on May 2 only. When there are multiple Dynamic Content items assigned to the same space with the similar delivery conditions, the priority level determines which one is displayed.
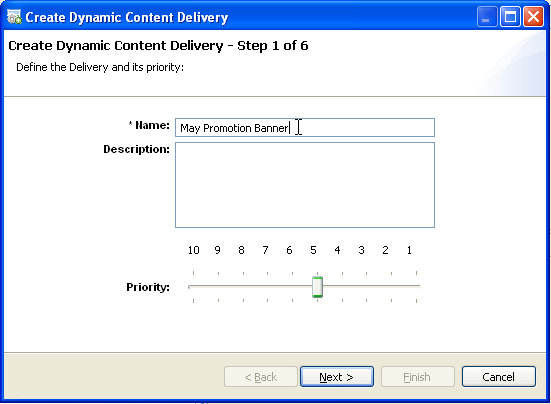
- Click Next.
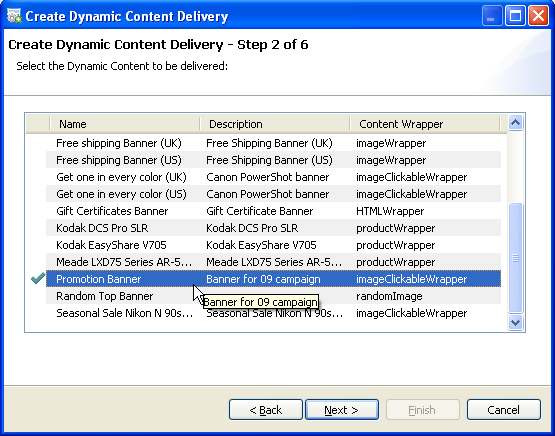
- Select the Dynamic Content you want to display. Then click Next.
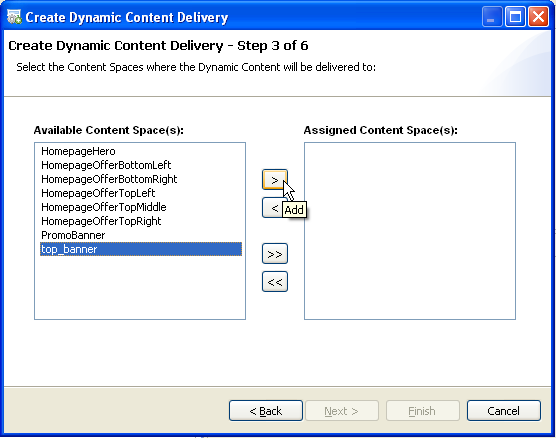
- Select the Content Spaces where you want the Dynamic Content to appear and click the right arrow to add them to the Assigned Content Spaces list. Then click Next.
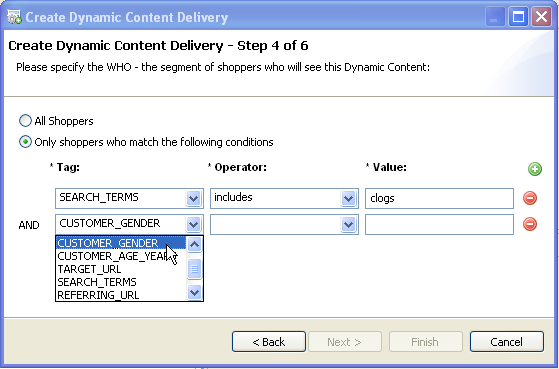
- For each tag you want to evaluate, do the following:
- Click the plus button.
- Select the tag in the list.
- Select an operator.
- Configure the value. Note:
Multiple conditions are combined using a logical AND. Make sure that you do not create conflicting conditions. For example,CUSTOMER_GENDER equalTo F and CUSTOMER_GENDER equalTo M would effectively cancel each other and the Dynamic Content would never be displayed.
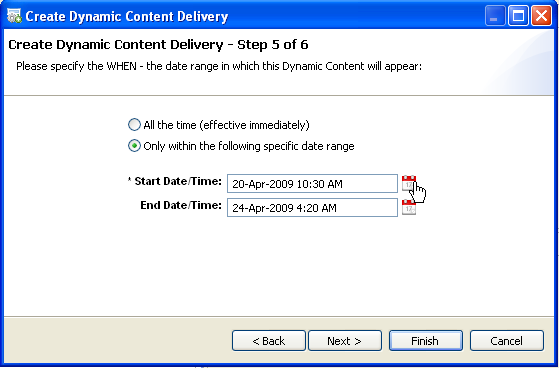
- Set the start and end dates/times for displaying the Dynamic Content. Then click Next. Note:
If you leave the dates blank, the Dynamic Content becomes active immediately and will always be available until these conditions are changed.
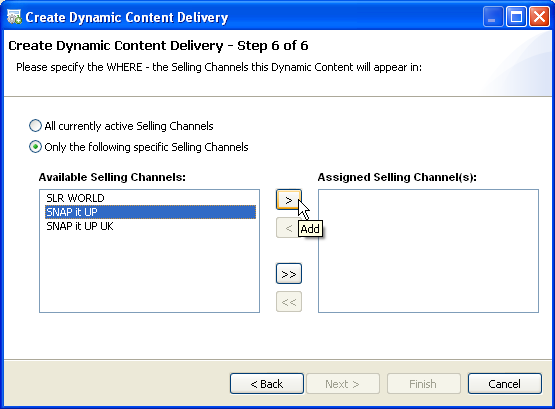
- Select the stores where you want to display the Dynamic Content.
- Click Finish.

