Prepare Source Code
Prepare Source Code
| Dependent on | By | Documentation |
|---|---|---|
| Source control provisioning | IT Operations | Prepare Infrastructure |
| Maven repository setup | Dev Ops | Setup Maven Repository |
Overview
This page describes how to prepare Elastic Path source code for use by your project. The diagram below shows the steps.
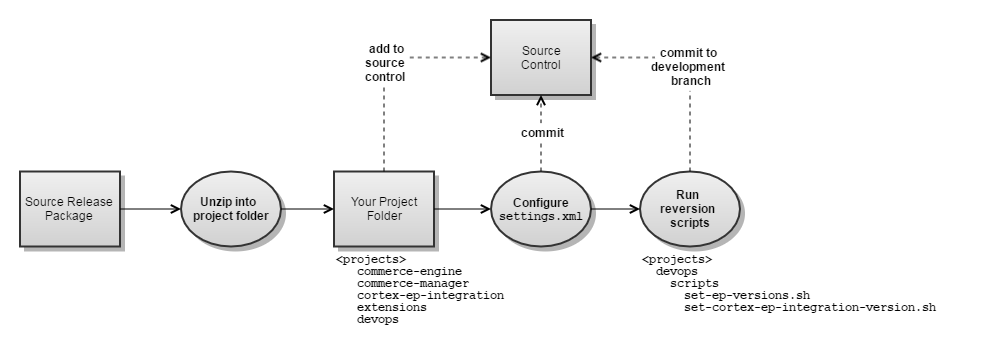
Setup local build environment
Unzip source release packages
EP source is delivered in the following release package:
| Release Package | Contents |
|---|---|
| EP-Commerce-7.0.1.zip | Core Commerce, Cortex |
- Unzip the contents of the release package into your project source folder.
Add projects to source control
- Add the following projects to source control: commerce-manager,
commerce-engine, cortex-ep-integration,
devops and extensions. (Note: the
commerce-data project is included in the release package for
reference and doesn't need to be added to source control.Tip:
Previously the common practice had been to add each project to source control as a separate repository. Recently, a number of project teams have found it to be more effective to have all projects in a single repository as this simplifies commits and builds across multiple projects.
The rational for using multiple repositories was that different upgrade strategies were needed for different projects. A newer upgrade strategy has emerged that works with a single repository and is being adopted as a standard practice.
- Create a development branch for each repository. The branch name depends on your SCM and branch naming conventions.
Create a global build POM (optional)
If you have committed all source projects to a single repository (see previous section) you will probably want a POM at the repository root that acts as a build driver for all sub-projects so you can build the system with a single Maven command.
Here is a sample POM that works without requiring modifications to any of the sub-projects.
<?xml version="1.0" encoding="UTF-8"?>
<project xmlns="http://maven.apache.org/POM/4.0.0" xmlns:xsi="http://www.w3.org/2001/XMLSchema-instance" xsi:schemaLocation="http://maven.apache.org/POM/4.0.0 http://maven.apache.org/maven-v4_0_0.xsd">
    <modelVersion>4.0.0</modelVersion>

    <parent>
        <groupId>com.elasticpath</groupId>
        <artifactId>grandparent</artifactId>
        <version>100</version>
    </parent>

    <groupId>com.elasticpath</groupId>
    <artifactId>commerce-build</artifactId>
    <packaging>pom</packaging>

    <name>Commerce Global Build POM</name>
    <version>0.0.0-SNAPSHOT</version>

    <!-- Reactor for development builds -->
    <modules>
        <module>commerce-engine</module>
        <module>cortex-ep-integration</module>
        <module>commerce-manager/cm-invoker</module>
        <module>extensions</module>
    </modules>

    <profiles>
        <!-- Profile to build deployment package at end of reactor -->
        <profile>
            <id>deployment-package</id>
                <modules>
                    <module>extensions/packager/ext-deployment-package</module>
                </modules>
        </profile>

        <!-- Profile to be activated in IDE so that CM plugins are recognized -->
        <profile>
            <id>ide-cm-plugins</id>
                 <modules>
                     <module>commerce-manager</module>
                     <module>extensions/cm</module>
                 </modules>
       </profile>
    </profiles>

</project>
Configure the project settings.xml
The extensions project you just added to source control has a maven/settings.xml the project teams will use.
- Replace the <mirror> <url> at the the top of the file with the <Project> EP Repository Group URL documented during Setup Maven Repository.
- Make any changes required for your project environment.
- Commit the changes to source control.
- Copy the settings.xml to your ${user.home}/.m2 directory.
Reversion projects for development
EP release packages contain projects with RELEASE versions. Prior to starting development, the projects must be reversioned to SNAPSHOT versions using scripts provided in the devops project.
On Windows, use either Git Bash, MinGW, or Cygwin to run the script.
To reversion projects for development:
- Make sure that:
- All projects have a common parent folder.
- Project folders have the same names as ones provided in source release packages.
- The development branch is checked out for each source repository.
- Run the following script to reversion the commerce-manager,
commerce-engine, devops and
extensions projects.
cd <projects-parent-folder> ./devops/scripts/set-ep-versions.sh 700.1.0-SNAPSHOT 0.0.0-SNAPSHOT commerce-engine extensions commerce-manager devops - (Optional) Run the following script to reversion the cortex-ep-integration project. If you don't reversion this project, then the cortex-ep-integration release binaries will be retrived from the Elastic Path Nexus repository. You will need to reversion the project to a SNAPSHOT version if you wish to make changes to it.
cd <projects-parent-folder>
      ./devops/scripts/set-cortex-ep-integration-version.sh 700.1.0-SNAPSHOT 0.0.0-SNAPSHOT cortex-ep-integration extensions
Apply patches
Once you have the release package built and running without issue, apply any patches available for Elastic Path Commerce. To apply a patch:
- Go to the Support Portal and log in with your username and password.
- Navigate to Patches.
- In the Patches page, under Browse All Patches, select the product and version.
- Download all patches for your version of Elastic Path Commerce.
- Read the patch's README.txt and follow the instructions in it to apply the patch.
- Navigate to extensions/cortex/resources-api/pom.xml.
- Change the <version> of
ep-resource-base-api to ${cortex.version}
as shown below:
<dependency>
                     <groupId>com.elasticpath.rest.definitions</groupId>
                     <artifactId>ep-resource-base-api</artifactId>
                     <version>${cortex.version}</version>
                     </dependency>
You must make this change before building the Extensions project.