Prepare Source Code
Prepare Source Code
Overview
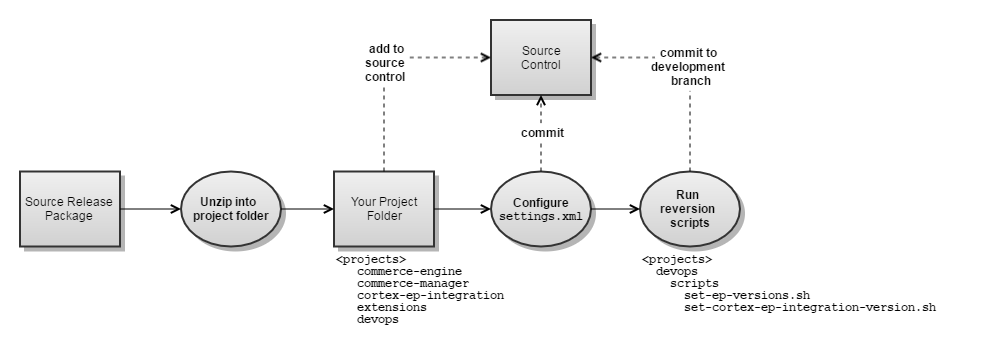
This page describes how to prepare Elastic Path source code for use by your project. The diagram below shows the steps.
Setup local build environment
Unzip source release packages
EP source is delivered in the following release package:
| Release Package | Contents |
|---|---|
| EP-Commerce-7.0.1.zip | Core Commerce, Cortex |
- Unzip the contents of the release package into your project source folder.
Configure the project settings.xml
The extensions project has a maven/individual-settings.xml you will use.
- Change EP_REPOSITORY_USER and EP_REPOSITORY_PASSWORD
to the credentials used for connecting to our public
Nexus.
<servers> <server> <id>ep-public</id> <username>EP_REPOSITORY_USER</username> <password>EP_REPOSITORY_PASSWORD</password> </server> <server> <id>ep-cortex</id> <username>EP_REPOSITORY_USER</username> <password>EP_REPOSITORY_PASSWORD</password> </server> <server> <id>ep-commerce-engine</id> <username>EP_REPOSITORY_USER</username> <password>EP_REPOSITORY_PASSWORD</password> </server> <server> <id>ep-accelerators</id> <username>EP_REPOSITORY_USER</username> <password>EP_REPOSITORY_PASSWORD</password> </server> </servers> - Make any changes required for your project environment.
- Commit the changes to source control.
- Rename individual-settings.xml to settings.xml copy it to your ${user.home}/.m2 directory.
Reversion projects for development
EP release packages contain projects with RELEASE versions. Prior to starting development, the projects must be reversioned to SNAPSHOT versions using scripts provided in the devops project.
Tip:
On Windows, use either Git Bash, MinGW, or Cygwin to run the script.
To reversion projects for development:
- Make sure that:
- All projects have a common parent folder.
- Project folders have the same names as ones provided in source release packages.
- The development branch is checked out for each source repository.
- Run the following script to reversion the commerce-manager,
commerce-engine, devops and
extensions projects.
cd <projects-parent-folder> ./devops/scripts/set-ep-versions.sh 700.1.0-SNAPSHOT 0.0.0-SNAPSHOT commerce-engine extensions commerce-manager devops - (Optional) Run the following script to reversion the cortex-ep-integration project. If you don't reversion this project, then the cortex-ep-integration release binaries will be retrived from the Elastic Path Nexus repository. You will need to reversion the project to a SNAPSHOT version if you wish to make changes to it.
cd <projects-parent-folder>
      ./devops/scripts/set-cortex-ep-integration-version.sh 700.1.0-SNAPSHOT 0.0.0-SNAPSHOT cortex-ep-integration extensions
Set up local Developer environment
Follow the instructions at Setting up your Developer Environment to configure, build and run Elastic Path Commerce in a command line environment.