Deploy to Dev Team Server
Deploy to Dev Team Server
Overview
The Dev Team server has the simplest possible deployment topology - a local MySQL database, a local ActiveMQ JMS broker, and a single Tomcat instance running all web apps. For AEM developers, the pusher can also deploy EP for AEM bundles to target AEM author or publish instance(s).
The Pusher Accelerator Kit is used to deploy EP applications to the Dev Team server. The Pusher contains a set of Bash scripts that can be configured to handle single server deployments as well as more complex deployment topologies. A copy of the Pusher source is included in the devops/pusher-package module.
The basic deployment components are:
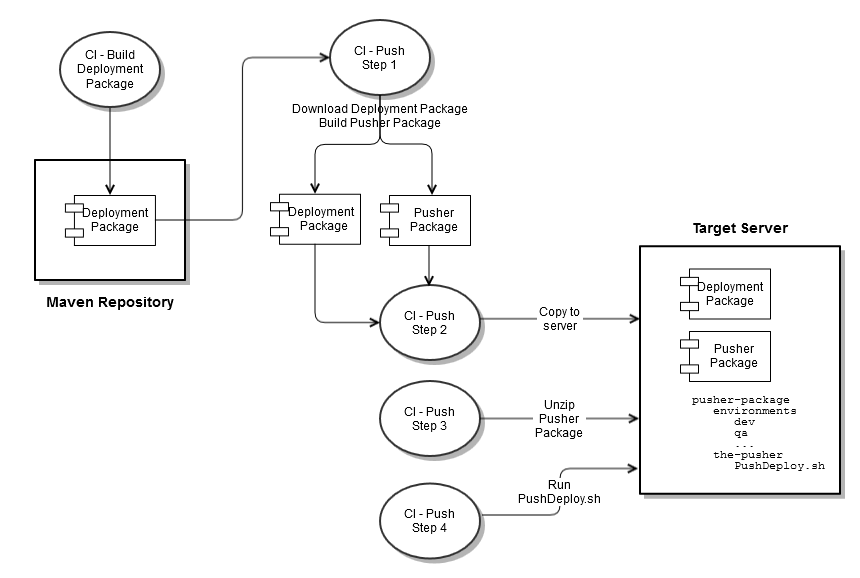
- A deployment package that is built by the extensions/packager module. The same package can be deployed to multiple environments without changes using a "Build once, deploy anywhere" approach.
- A pusher package that is built by the devops/pusher-package module.
Deployment package
The deployment package contains:
- WAR files for all EP webapps
- Data and properties from the extensions/database module - these are used to update the database schema and catalog data.
- Tools - Data Population and Import/Export
- CM Client executables
- JAR files - database driver and Active MQ dependencies required by Tomcat
- Tomcat installation package - to install Tomcat for the first time (if desired)
For AEM Developers, it also includes
- EP Commerce API
- Geometrixx Demo store
Pusher package
The pusher package contains:
- Configuration files for target environments that are controlled by the construction team. For production environments the configuration files are typically managed separately.
- A copy of The Pusher Accelerator Kit - a set of scripts that manages the deployment process.
Deployment process
An overview of the deployment process is shown in the diagram below. Typically there are two CI jobs - one to build a deployment package, and the second to push to the target environment.

Configuration steps
- Verify that the target server has been configured as specified by Prepare Infrastructure.
- Review the target server requirements on The Pusher - Quick Start page and implement any missing requirements.
- Configure the following files in the extensions/database/ext-data/src/main/resources/environments/dev/ folder:
- filtering.properties - filtering of catalog data
- Configure the following files in devops/pusher-package/environments/dev/ folder:
- database.properties - database connection information
- data-population-properties - data population configuration
- pusher.conf - configuration for the Pusher
Refer to The Pusher - Quick Start page for configuration tips.
Deployment steps
You can deploy to the Dev Team server using the following CI jobs that were created in Setup CI Server.
- Run the Deployment Package job and wait for it to complete.
- Run the Deploy to Dev Server job and wait for it to complete.
- You can smoke test the deployment using the following URLs:
Component URL Notes Cortex Studio http://<hostname>:8080/studio Expand the Authentication utility menu, then click the Revoke Acccess and Authenticate buttons.You should be granted access. Search Server http://<hostname>:8080/search/status/info.html Search server health monitor CM Server http://<hostname>:8080/cmserver/status/info.html CM server health monitor Integration Server http://<hostname>:8080/integration/status/info.html Integration server health monitor Storefront http://<hostname>:8080/storefront/status/info.html Storefront health monitor. The <hostname> must match a configured store URL. Actiive MQ http://<hostname>:8161/admin Active MQ control panel. EP for AEM deployment Geometrixx Demo Store http://<AEM_hostname>:4502/content/geometrixx-outdoors/en_US.html The Geometrixx Demo storefront on the Author instance Geometrixx Demo Store http://<AEM_hostname>:4503/ The Geometrixx Demo storefront on the Publish instance

