Prepare Source Code
Prepare Source Code
| Dependent on | By | Documentation |
|---|---|---|
| Source control provisioning | IT Operations | Prepare Infrastructure |
| Maven repository setup | Dev Ops | Setup Maven Repository |
Overview
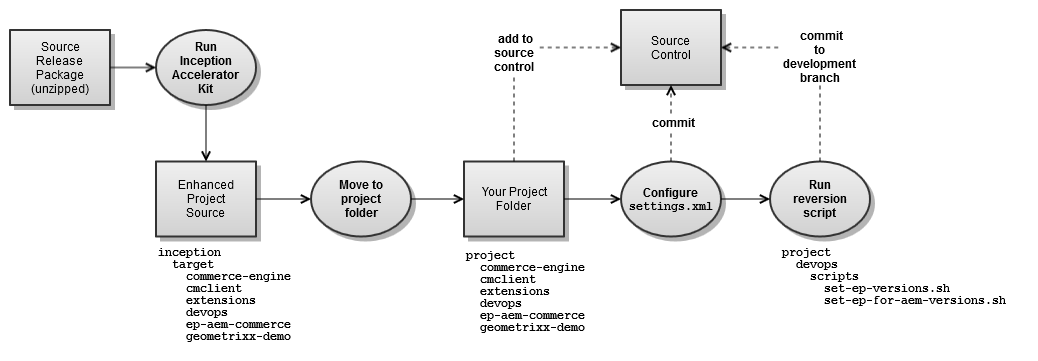
This page describes how to prepare Elastic Path source code for use by your project. The diagram below shows the steps.
ep-aem-commerce and geometrixx-demo projects are only available with EP-Commerce-for-AMC-Spring-2015.zip package
Setup local build environment
Unzip source release package
EP source is delivered as a single ZIP file. You should obtain one of the following release packages depending on your license and the environment you wish to create:
| Release package | Contents |
|---|---|
| EP-Commerce-for-AMC-Spring-2015.zip | EP Commerce for Adobe Marketing Cloud, Cortex, Core Commerce |
| EP-Commerce-Spring-2015.zip | Cortex, Core Commerce |
| EP-Core-Commerce-6.14.zip | Core Commerce |
- Unzip the contents of the release package into a local directory.
Warning: Windows File Path Limitation
Do not checkout your source code to a directory that is greater than 20 characters in length. Windows file paths are limited to 260 characters. The longest file path in the source code is greater than 230 characters so be careful where you deploy your source files.
Configure a temporary settings.xml
The source release package contains a settings.xml file in the extensions/maven folder.
- Copy the settings.xml to your ${user.home}/.m2 directory.
- Replace the <mirror> <url> at the the top of the file with the <Project> EP Repository Group URL documented during Setup Maven Repository.Warning:
Do not reverse the order of these steps. You must first copy the file and then substitute the URL
Configure and run the Inception accelerator
The Inception Accelerator Kit enhances and customizes the EP release package. See Starting Construction Guide (Resources) if you don't have a copy.
- Unzip the accelerator into a local directory. On Windows the directory path must be less than 20 characters in length.
- Configure the following client-specific values in config/inception.properties.
Property Description Example (Company Inc.) ep.release.package.directory The directory containing the unzipped EP release package
Warning:On Windows, use either forward slashes or escaped backslashes. e,g. c:/ep/release-package c:\\ep\\release-package
client.group.id The Maven groupId for extension project artifacts. It must follow the Java package name rules and start with a domain name you control.
Warning:Do not use com.elasticpath as your groupId. This will result in conflicts between extension artifact names and product artifact names
com.company.ep client.package.name The package name for Java source code com.company.ep client.package.directory The directory path corresponding to the package name for Java source code com/company/ep - Run the Inception accelerator from the command line. The commands you execute depend on the release package being processed:
Release package Commands EP-Commerce-for-AMC-Spring-2015.zip cd inception mvn clean package -Pwith-cortex,with-aem
EP-Commerce-Spring-2015.zip cd inception mvn clean package -Pwith-cortex
EP-Core-Commerce-6.14.zip cd inception mvn clean package
Add projects to source control
- Create a new folder for your project source.
Warning: Windows File Path Limitation
Do not checkout your source code to a directory that is greater than 20 characters in length. Windows file paths are limited to 260 characters. The longest file path in the source code is greater than 230 characters so be careful where you deploy your source files.
- Move the cmclient, commerce-engine, devops, extensions, (ep-aem-commerce & geometrixx-demo, if applicable) projects from inception/target to your project source folder.
- Add each project to source control as a separate project.Tip:
If you use GitHub or a similar Git hosting service, follow the instructions in Add Source to GitHub.
- Create a development branch for each project. The branch name will depend on your SCM and branch naming conventions.
- Delete the unzipped EP release package. It is no longer needed.
Configure the project settings.xml
The extensions project you just added to source control has a maven/settings.xml file that will be used by the project team.
- Replace the <mirror> <url> at the the top of the file with the <Project> EP Repository Group URL documented during Setup Maven Repository.
- Make any other changes that are required by your project environment.
- Commit the changes to source control.
- Copy the settings.xml to your ${user.home}/.m2 directory, replacing the temporary one your created earlier.
Reversion projects for development
The EP release package contains projects with RELEASE versions. Prior to starting development the projects need to be reversioned to SNAPSHOT versions.
- Determine the version numbers to use for the development branch. See Construction Practices - Version Numbers for information on EP version number conventions and restrictions.
- Ensure each project is checked out under the development branch.
- Follow the steps in Construction Practices - Update Version Numbers.