
Upgrading Self-Managed Commerce
This section provides generic instructions to upgrade a version of Self-Managed Commerce to a newer version. Depending on your customizations, you might need to perform additional tasks before, during, or after the upgrade.
The upgrade process consists of three phases:
- Preparation: Gathers information about your known customizations and decide how you want to mitigate your risks.
- Customization Analysis (Optional): Analyzes and determines what customizations are made. This optional phase is for organizations if the customizations made to the platform is unknown.
- Upgrade: Performs the upgrade to a newer version of Self-Managed Commerce.
Preparation
The preparation phase involves gathering information and mitigating risks before performing the upgrade. The following diagram shows an overview of the preparation process:
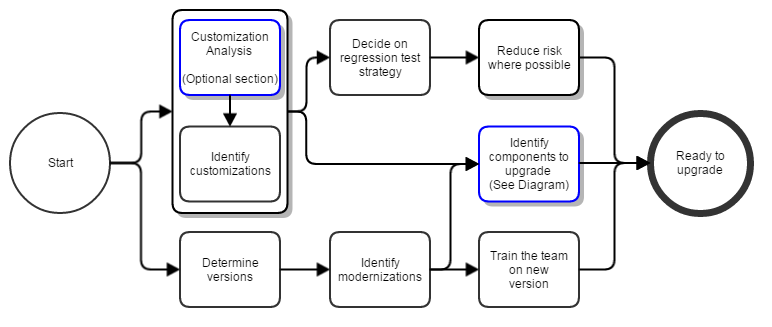
Identify customizations: Create a list of all known Self-Managed Commerce platform customizations. To determine your platform customizations, see Customization Analysis and reverse engineer the code to find them.
Determine versions: Get the appropriate source code for your upgrade.
Identify modernizations: Do the following:
- Review the documentation and technology stack for the new version of Self-Managed Commerce
- Review the Release Notes, for the current version of Self-Managed Commerce and for all versions until the version you are upgrading to or other details
Review version-specific upgrade notes: Review the upgrade notes for your target version and all intermediate versions since your current version.
Identify a regression test strategy: Identify customizations that lack written or automated test cases.
Reduce risk where possible: Do the following:
- Address the risks found during the Customization Analysis
- Improve test coverage
- Refactor code
- Provision the resources that require time to arrange ahead of time, such as new hardware or training
- Defer upgrades of independent systems (scope reduction)
Train the team on new version: Create a training plan to train the team on new technologies, if any.
Identify components to upgrade: Identify the minimum set of components or dependencies that must be upgraded. Hosted infrastructure might need to be upgraded for the new Elastic Path platform.
Customization Analysis
Customization analysis helps you derive a complete list of the customizations that are made to the platform in a time-boxed investigation. This section focuses on the completeness of the list, not on the detailed understanding of each customization.

- Apply reverse engineering patterns: Reverse engineering is a general software engineering practice.
- Identify risks in the source code: Record the following problems if you find them while examining the source code:
- No test coverage
- Code smells
- Cross-cutting concerns
- Identify risks in the infrastructure: Record the following problems if you find them while examining the environment installation, build, deploy, and release processes:
- No Continuous Integration
- Manual deploy or release process
- Lack of staging environments
- Prepare upgrade action list: Arrange the unorganized list of features or customizations for one of the following upgrade actions:
- Upgrade feature as-is
- Problematic feature implementation that requires reimplementation
- Implement a new feature using functionality in a newer version of Self-Managed Commerce
- Remove unused code or feature
Upgrade
The upgrade phase involves the steps to merge the latest release with your customizations, deploy the new environments, and cut over to the upgraded environment. The steps required for this phase are illustrated at a high level by the diagram below:
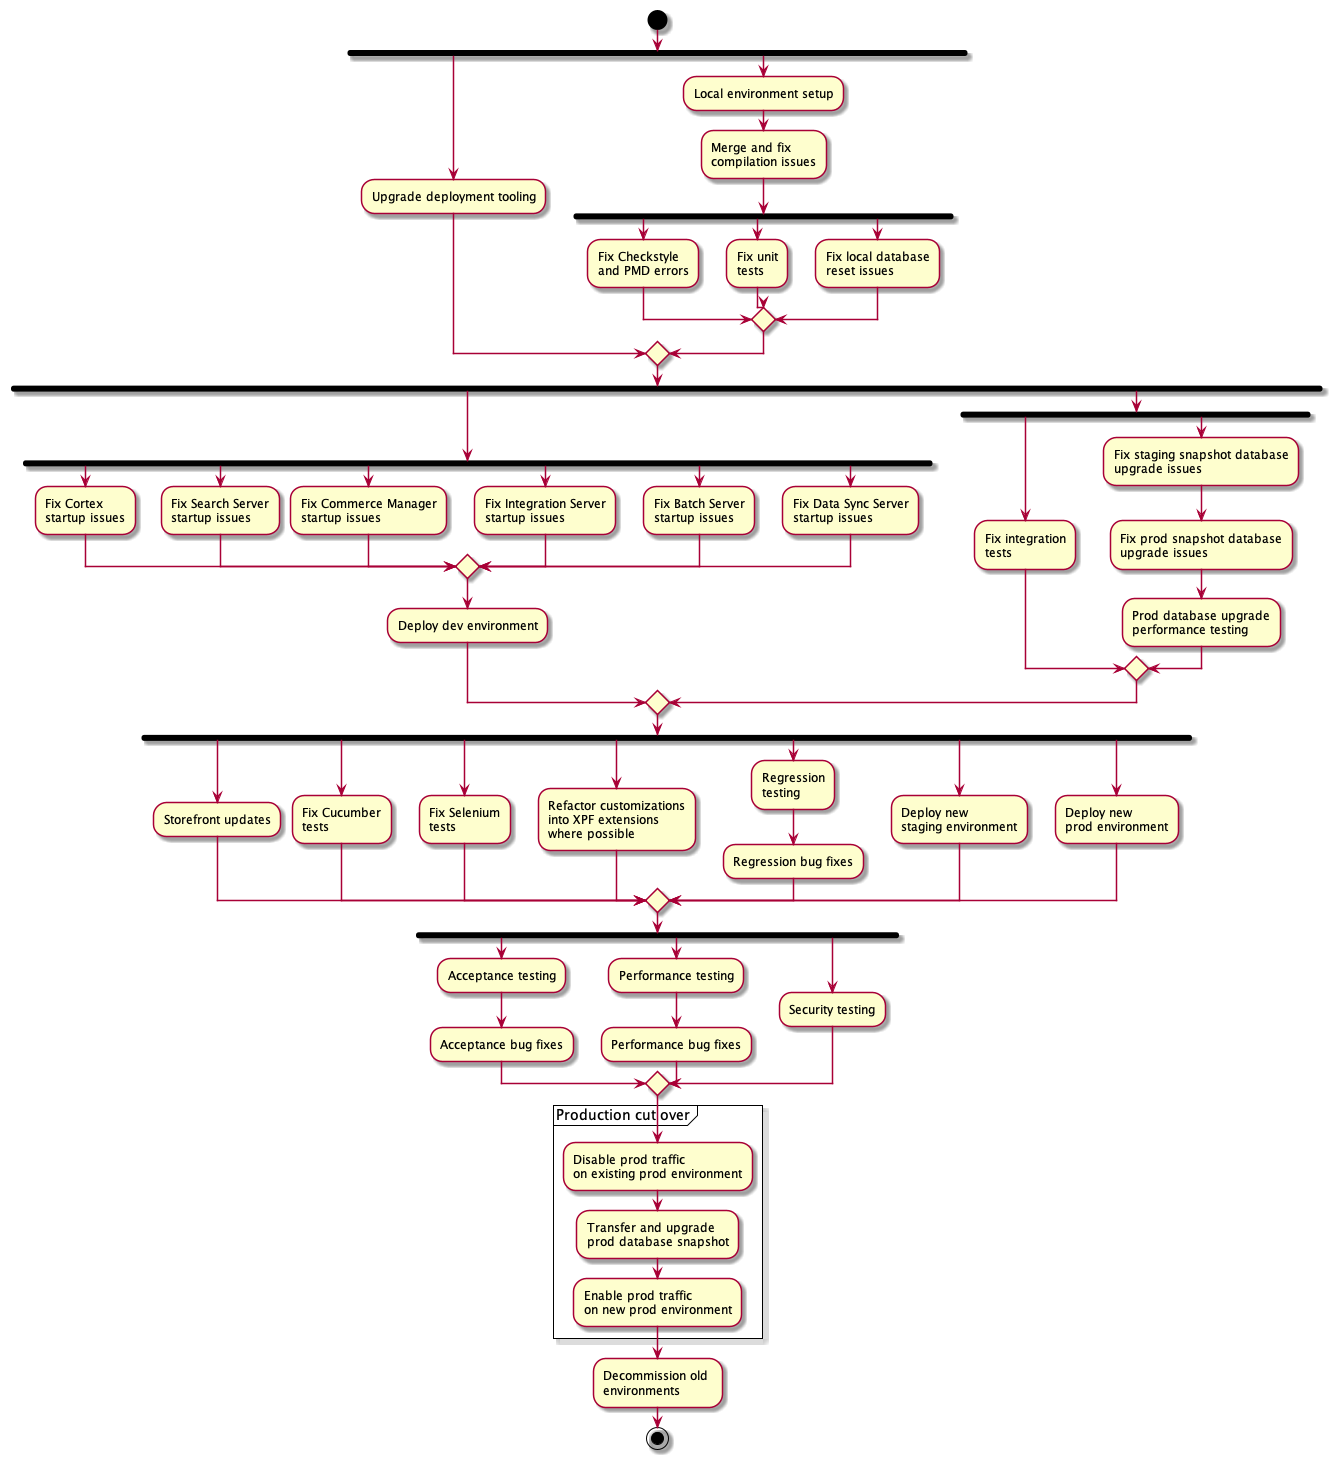
The steps in this phase should be followed starting at the top and making your way down the tree. Each step can be completed as long as the steps with arrows directing to that step are completed. If multiple steps are available, these can be completed in parallel by different team members. Each step is described in more detail in the sections below:
Local environment setup
Review the Configuring Environment steps for your target version. In some cases, the required Java version, Maven version, database version, or IDE configuration may have changed. Ensure that your local environment is setup properly to allow you to build the source code and startup the services locally.
Upgrade deployment tooling
Ensure that your deployment tooling is able to deploy both your existing Self-Managed Commerce version as well as the target version.
If you are using CloudOps for Kubernetes, review the compatibility matrix to identify a version that can support both your existing and target Self-Managed Commerce versions. If necessary, upgrade CloudOps for Kubernetes to ensure that your build and deployment pipelines function correctly.
Upgrade the source code
We recommend using the Self-Managed Commerce Upgrader Tool with AI Assist Mode to upgrade your source code and address all compilation and test failures.
First, install the Self-Managed Commerce Upgrader tool using the installation instructions.
Open a terminal window and change the current directory to your existing ep-commerce source code folder. Make sure you are in your main branch, and have retrieved the latest source code.
Follow the instructions for connecting to code.elasticpath.com for use by the Self-Managed Commerce Upgrader tool.
Create a branch for the upgrade by running the following (replace the version number with the version you are targeting):
git checkout -b upgrade/8.4.x
Start the AI Assist process in the Self-Managed Commerce Upgrader Tool. This step will generate an upgrade plan file named smc-upgrader-plan.md and commit it to Git with a commit message starting with Generated upgrade plan.
Continue the AI Assist process in the Self-Managed Commerce Upgrader Tool. Repeat this until all of the steps are completed.
Deploy dev environment
In this step, deploy a dev environment for the target version using your deployment tooling and ensure that all services start successfully and can be accessed by your development team.
If you are using CloudOps for Kubernetes, see Options for Deploying Self-Managed Commerce Environments.
Fix staging snapshot database upgrade issues
In this step, ensure that your staging database can be upgraded to the target version without issues. To test the upgrade process, follow these sub-steps:
- Create a snapshot of your staging database. This can be done using database or AWS-specific tooling.
- Restore the snapshot to a new database or schema. This can be done using database or AWS-specific tooling.
- Run the Data Population Tool against the restored database using the
update-dbcommand to upgrade the schema and data to be compatible with the new target version. - Ensure that the job completes successfully. If not, address any failures in the Liquibase changesets.
- Delete the staging database.
An example of how to do this using CloudOps for Kubernetes is as follows:
- Create a snapshot of your staging database using the AWS console.
- Run the
create-and-manage-data-serverJenkins job, setting thesnapshotToRestoreparameter to the name of the snapshot generated in step 1. - Run the
run-data-pop-toolJenkins job, setting thedataPopToolCommandparameter toupdate-db, and setting thekubernetesNicknamevalue to the same value specified in step 2. - Run the
create-and-manage-database-serverJenkins job, setting thekubernetesNicknamevalue to the same value specified in step 2, and setting thedeleteDatabaseparameter.
Fix prod snapshot database upgrade issues
In this step, ensure that your production database can be upgraded to the target version without issues. To test the upgrade process, follow these sub-steps:
- Create a snapshot of your staging database. This can be done using database or AWS-specific tooling.
- Restore the snapshot to a new database or schema. This can be done using database or AWS-specific tooling.
- Sanitize the data by clearing sensitive customer and order data with personally-identifiable information.
- Run the Data Population Tool against the restored database using the
update-dbcommand to upgrade the schema and data to be compatible with the new target version. - Ensure that the job completes successfully. If not, address any failures in the Liquibase changesets.
- Delete the prod database.
An example of how to do this using CloudOps for Kubernetes is as follows:
- Create a snapshot of your production database using the AWS console.
- Run the
create-and-manage-data-serverJenkins job, setting thesnapshotToRestoreparameter to the name of the snapshot generated in step 1. - Sanitize the data by clearing sensitive customer and order data with personally-identifiable information.
- Run the
run-data-pop-toolJenkins job, setting thedataPopToolCommandparameter toupdate-db, and setting thekubernetesNicknamevalue to the same value specified in step 2. - Run the
create-and-manage-database-serverJenkins job, setting thekubernetesNicknamevalue to the same value specified in step 2, and setting thedeleteDatabaseparameter.
Prod database upgrade performance testing
In this step, we repeat the steps described in Fix prod snapshot database upgrade issues, but this time make note of how long the upgrade process takes. This is important because it reflects how long your site will be offline during the production cutover. If the upgrade process is taking too long, review the logs and identify which changeset IDs are taking the most time, and open a support request for assistance.
Storefront updates
In this step, connect a test deployment of your front-end to the dev environment with the target version of Self-Managed Commerce. Ensure that all functionality still works as expected. Unless you are upgrading to a new major release, the Cortex API should be backwards compatible with the previous version.
Refactor customizations into Extension Point Framework extensions where possible
The Extension Point Framework is a new approach to building customizations that isolates your custom code from the platform source. It also provides guarantees around compatibility of your customizations with future upgrades. Review the compatibility matrix to see which versions of the Extension Point Framework Connectivity Library are compatible with your target version of Self-Managed Commerce. Then review the Extension Points that are available in that version to determine if any of your customizations are candidates to be migrated into Extension Point Framework extensions.
For more information about the Extension Point Framework, see our documentation.
Regression testing
Test the storefront and Commerce Manager using the dev environment to ensure that all expected functionality is working as expected.
Regression bug fixes
In this step, address any broken functionality found during regression testing.
Deploy new staging environment
In this step, we deploy a staging environment for the target version using your deployment tooling. To do this, follow these sub-steps:
- Create a snapshot of your staging database. This can be done using database or AWS-specific tooling.
- Restore the snapshot to a new database or schema. This can be done using database or AWS-specific tooling.
- Run the Data Population Tool against the restored database using the
update-dbcommand to upgrade the schema and data to be compatible with the new target version. - Deploy the Self-Managed Commerce services, connecting to the database that was restored.
An example of how to do this using CloudOps for Kubernetes is as follows:
- Create a snapshot of your staging database using the AWS console.
- Run the
create-and-manage-data-serverJenkins job, setting thesnapshotToRestoreparameter to the name of the snapshot generated in step 1. - Run the
run-data-pop-toolJenkins job, setting thedataPopToolCommandparameter toupdate-db, and setting thekubernetesNicknamevalue to the same value specified in step 2. - Run the
deploy-or-delete-commerce-stackJenkins job, setting thekubernetesNicknamevalue to the same value specified in step 2.
Deploy new prod environment
In this step, we deploy a prod environment for the target version using your deployment tooling. To do this, follow these sub-steps:
- Create a snapshot of your prod database. This can be done using database or AWS-specific tooling.
- Restore the snapshot to a new database or schema. This can be done using database or AWS-specific tooling.
- Sanitize the data by clearing sensitive customer and order data with personally-identifiable information.
- Run the Data Population Tool against the restored database using the
update-dbcommand to upgrade the schema and data to be compatible with the new target version. - Deploy the Self-Managed Commerce services, connecting to the database that was restored.
An example of how to do this using CloudOps for Kubernetes is as follows:
- Create a snapshot of your prod database using the AWS console.
- Run the
create-and-manage-data-serverJenkins job, setting thesnapshotToRestoreparameter to the name of the snapshot generated in step 1. - Sanitize the data by clearing sensitive customer and order data with personally-identifiable information.
- Run the
run-data-pop-toolJenkins job, setting thedataPopToolCommandparameter toupdate-db, and setting thekubernetesNicknamevalue to the same value specified in step 2. - Run the
deploy-or-delete-commerce-stackJenkins job, setting thekubernetesNicknamevalue to the same value specified in step 2.
Acceptance testing
Arrange with your business users to test the storefront and Commerce Manager using the new staging and prod environments to ensure that all expected functionality is working as expected. Also ensure that the business users are aware of the release highlights showing new features in the release.
Acceptance bug fixes
In this step, address any broken functionality reported by business users.
Performance testing
In this step, run a load test on your old and new staging environments and compare the results to ensure that performance has not degraded. To do this, we recommend using our Transactional Data Generator JMeter scripts. These scripts execute common commerce operations against the Cortex APIs and summarize results such as average response times and throughput.
Performance bug fixes
If any Cortex APIs are showing response time or throughput degradation, review the source code around these operations to identify the regression. We also recommend making use of the Query Analyzer to determine if any JPA queries are causing the performance regression.
Security testing
Review the deployment security document to ensure that your new prod environment follows security best practices. You may also want to consider a review or pen testing by your security team.
Disable prod traffic on existing prod environment
As the first step of the production cut over process, display a maintenance page on your front-end to prevent shoppers from transacting through Cortex. Also inform your business users to avoid making any changes through Commerce Manager.
Transfer and upgrade prod database snapshot
In this step, replace the existing (sanitized) prod database snapshot with the latest production database.
An example of how to do this using CloudOps for Kubernetes is as follows:
- Create a snapshot of your existing prod database using the AWS console.
- Run the
create-and-manage-database-serverJenkins job to delete the existing target database, setting thekubernetesNicknamevalue the name of the target prod environment, and setting thedeleteDatabaseparameter. - Run the
create-and-manage-data-serverJenkins job, setting thesnapshotToRestoreparameter to the name of the snapshot generated in step 1. - Run the
run-data-pop-toolJenkins job, setting thedataPopToolCommandparameter toupdate-db, and setting thekubernetesNicknamevalue to the same value specified in step 3.
note
If you are using author to live functionality, you may also need to repeat these steps for your author prod environment.
Enable prod traffic on new prod environment
Restart all services on your target prod environment. Configure your front-end to point to the new prod environment Cortex URLs. Remove the maintenance page.
Decommission old environments
In this step, delete the old service environments and databases that are no longer required.
An example of how to do this using CloudOps for Kubernetes is as follows:
- Run the
deploy-or-delete-commerce-stackJenkins job for each old environment, setting thekubernetesNicknameparameter to the name of environment, and setting thedeleteStackparameter. - Run the
create-and-manage-database-serverJenkins job for each old database, setting thekubernetesNicknamevalue to the name of environment, and setting thedeleteDatabaseparameter.