Managing Shipping or Receiving in Elastic Path Commerce
Overview
Warehouse allows users to complete shipments. It is accessible from the tool bar:

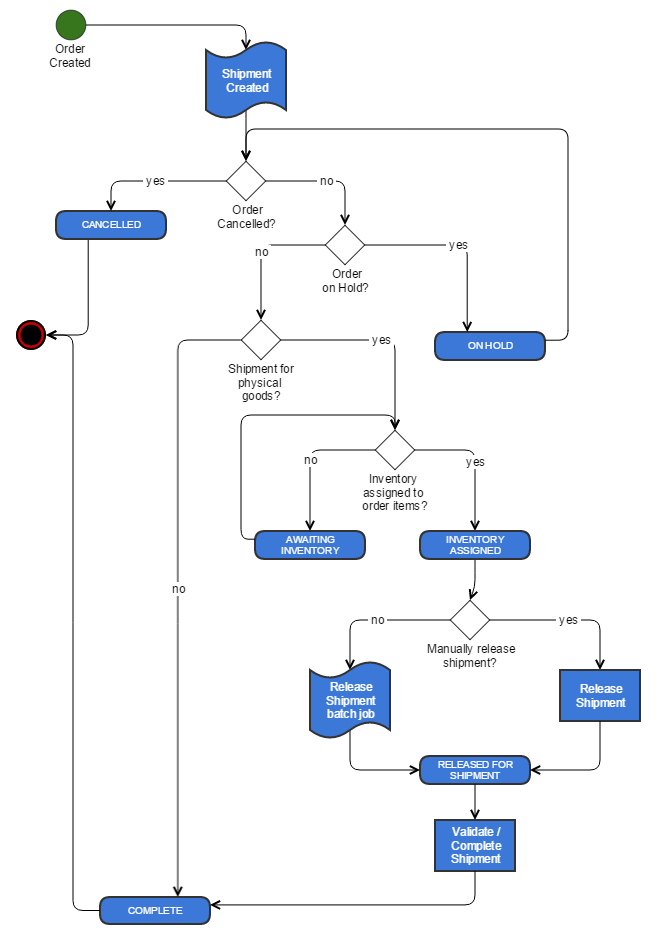
Shipment Workflow Process

Importing Inventory
Authorized users can increase the stock of existing products by importing inventory data from CSV (Comma Separated Values) files. This is an alternative to manually updating inventory levels for multiple products, especially if you have an external system to manage your inventory and you need to be able to import a large number of inventory changes in a batch.
Before you can import inventory, you must create a warehouse import job. The import job describes the column structure of the import data files and how those columns are mapped to the data fields.
Note: The CSV files may use characters other than commas to separate values if specified in Elastic Path Commerce’s configuration settings.
Creating a Warehouse Import Job
Create a CSV template file that describes the structure of the data you want to import.
- This file must contain one line of comma-separated values
- Each value should be either the column name or a description of the data in the column
For example, the CSV files that you need to import are structured as follows:
<product sku>,<quantity on hand>,<reorder quantity>,<reorder minimum>The line might look similar to the following:
Product SKU,Qty on Hand,Reorder Qty,Reorder MinimumOn the toolbar, click the Warehouse button.
On the top right pane toolbar, click the View Warehouse Import Jobs
 button. The Import Jobs tab opens.
Click Create Import Job. The Create Import Job wizard appears.
Configure the import job settings as follows:
- Warehouse
- The warehouse whose inventory needs to be updated
- Data Type
- This must be set to Inventory
- Import Type
- Select one of the following options:
- Insert & Replace: Inserts the inventory data for the product SKUs specified in the data file. If there is already inventory data for a SKU, it is overwritten with the data that is being imported
- Update: Updates all the inventory data for the product SKUs specified in the data file
- Insert: Inserts the inventory data for the product SKUs specified in the data file. If there is already inventory data for a SKU, the data is not imported
- Delete: Deletes all the inventory data for the product SKUs specified in the data file
- Clear then Insert: Clears the data for the product SKUs specified, and then inserts the inventory data for the product SKUs
- Select one of the following options:
- Import Name
- The name to display in the list of warehouse import jobs
- CSV Import File
- The CSV import file that was created in step 1
- Column Delimiter
- The character that separates each value in a line
- All the text values must begin and end with the text delimiter character
- Text Delimiter
- He character that surrounds each text value in a line
- Max errors during import (default)
- The number of non-fatal errors that can occur before an import of this type is terminated
- Warehouse
Click Next. Elastic Path Commerce verifies that the CSV file contains valid data and reports any errors. If there are any errors found, correct them, and then click Back to repeat this step.
In the Map Data Fields window of the wizard, you must specify how the data in the CSV file is mapped to the inventory fields. For each data field to map, select the field in the Data Fields list, select the appropriate column in the CSV Columns list, and click Map.
Note: It is not necessary to map all the data fields to all the CSV columns. Only the productSku field must be mapped.
Click Finish
Executing a Warehouse Import Job
On the toolbar, click the Warehouse button.
On the top right pane toolbar, click the View Warehouse Import Jobs
 button. The Import Jobs tab opens.
Select the job that you want to run.
On the top right pane toolbar, click Run Import Job.
Click the browse button next to the CSV Import File field, and locate the CSV file that contains the inventory data you want to import.
Click Next. Elastic Path Commerce verifies that the CSV file contains valid data and reports any errors. Verification may take a few minutes, depending on the amount of data in the file. If there are any errors found, correct them, and click Back to repeat this step.
Click Finish. The import may take a few minutes, depending on the amount of data in the file
Completing a Shipment
After the package has shipped, the shipping personnel must complete the shipment in Elastic Path Commerce. Retailers do not receive the payment for the transaction until the shipment is completed (unless the store is configured for collection of payment at the time of purchase.)
On the toolbar, click the Warehouse button.
On the top right pane toolbar, click the Complete Shipment
 button. The Complete Shipment dialog box appears.
Enter the Shipment ID of the order you want to complete.
Click Validate. If it is a valid shipment ID, you can complete the order.
Click Complete
Switching Warehouses
On the toolbar, click the Warehouse button.
On the top right pane toolbar, click the Select Warehouse button
 to open the list of warehouses.
Select the warehouse you want to switch to
Retrieving the SKU Inventory Numbers
On the toolbar, click the Warehouse button.
In the Inventory tab on the left pane, enter a SKU Code, or click the icon next to the SKU Code field to display a dialog box for selecting a valid SKU Code.
Click Retrieve
