Injecting Commerce Configuration at Runtime
important
CloudOps for AWS is a legacy tool and is no longer supported by Elastic Path Software. CloudOps for AWS release 3.5.x reached end-of-support in February 2023. For information about current Elastic Path Commerce deployment options, see Deploying Elastic Path Commerce documentation.
Overview
Elastic Path Commerce Docker images support injecting commerce configuration at runtime of the containers. This is useful when:
- Deploying production environments where the configuration must be kept secret and should not be committed into the Elastic Path Commerce codebase
- For overriding configuration set in the Elastic Path Commerce codebase
This method of injecting configuration is secured using Git repositories, GPG keys and git-crypt.
Note: You must be familiar with Elastic Path Commerce configuration in the deployment package. For more details on configuration in the deployment package, see Elastic Path Commerce Configuration. For more information about environment configuration, see Environment Specific Configuration.
Additional setup is required in order to take advantage of this functionality. This includes:
- Creating a new Git repository containing configuration that will be injected
- Creating a new SSH key used for cloning the repository
- Creating a new GPG key used for encrypting the repository
- Using git-crypt to encrypt the Git repository
- Uploading the private SSH and GPG keys to AWS Secrets Manager
- Noting the public host key of the server hosting the new Git repository
This section guides you through all the steps required for the additional setup.
Pre-requisites
Creating the Git repository
Create a new Git repository
Note: Ideally, you would use the same Git repository hosting service used to host the Elastic Path CloudOps for AWS repositories.
Create a new SSH key-pair and authorize it under a utility account to clone the newly created repository.
Note: Password protected SSH keys are not supported
Encrypting the repository
Clone the Git repository that you created in the Creating the Git repository section
Run the following command to initialize the repository with git-crypt:
git-crypt initCreate a
.gitattributesfile in the repository with the following contents:* filter=git-crypt diff=git-crypt .gitattributes !filter !diffNote: This Git attributes file will configure git-crypt to encrypt everything in the repository. To configure git-crypt differently, see the git-crypt documentation.
Add and commit the
.gitattributesfile.Run the following command to create a new GPG key pair:
gpg --gen-keyNote: Password protected GPG keys are not supported. Additionally, we recommend to use a long-term utility account email instead of a personal email.
Run the following command to authorize the GPG key to unlock the repository:
git-crypt add-gpg-user $IDNote: Replace
$IDwith the ID of the GPG key from step 5.Run the following command to export the private GPG key to a local unencrypted directory:
gpg --export-secret-keys -a $ID > /path/to/unencrypted/directory/my-private-key.ascNote: Replace
$IDwith the ID of the GPG key from step 5
Adding Elastic Path Commerce Configuration
Add Elastic Path Commerce configuration to the repository in the same format as Commerce configuration in the deployment package.
Note: For more information about how configuration is stored in the deployment package, see the Elastic Path Commerce Configuration section.
You can include multiple configuration sets in the repository. The example below is for production configuration containing certificates and other secret information:
prod-author
   files
      conf
         secure
            author-certificate-1.p12
            author-certificate-2.p12
   secure-filtering.properties

prod-live
   files
      conf
         secure
            live-certificate-1.p12
            live-certificate-2.p12
   secure-filtering.properties
Add and commit the configuration files
Run
git-crypt statusto validate the files are encrypted correctlyThe output of the command should look similar to:
$ git-crypt status
not encrypted: .git-crypt/.gitattributes
not encrypted: .git-crypt/keys/default/0/6E34CFEF60D34EAD74735515634491886294C9C3.gpg
not encrypted: .gitattributes
    encrypted: prod-author/files/conf/ep.properties
    encrypted: prod-author/filtering.properties
    encrypted: prod-live/data-population.properties
    encrypted: prod-live/files/conf/cache/ehcache-2-seconds.xml
    encrypted: prod-live/files/conf/cortex/jwtTokenStrategy.config
    encrypted: prod-live/files/conf/ep.properties
    encrypted: prod-live/filtering.properties
Creating the AWS Secrets
Copy the contents of the private GPG key created in step 7 of section Encrypting the repository
The contents should start and end with the following lines:
----BEGIN PGP PRIVATE KEY BLOCK-----

<redacted>

-----END PGP PRIVATE KEY BLOCK-----
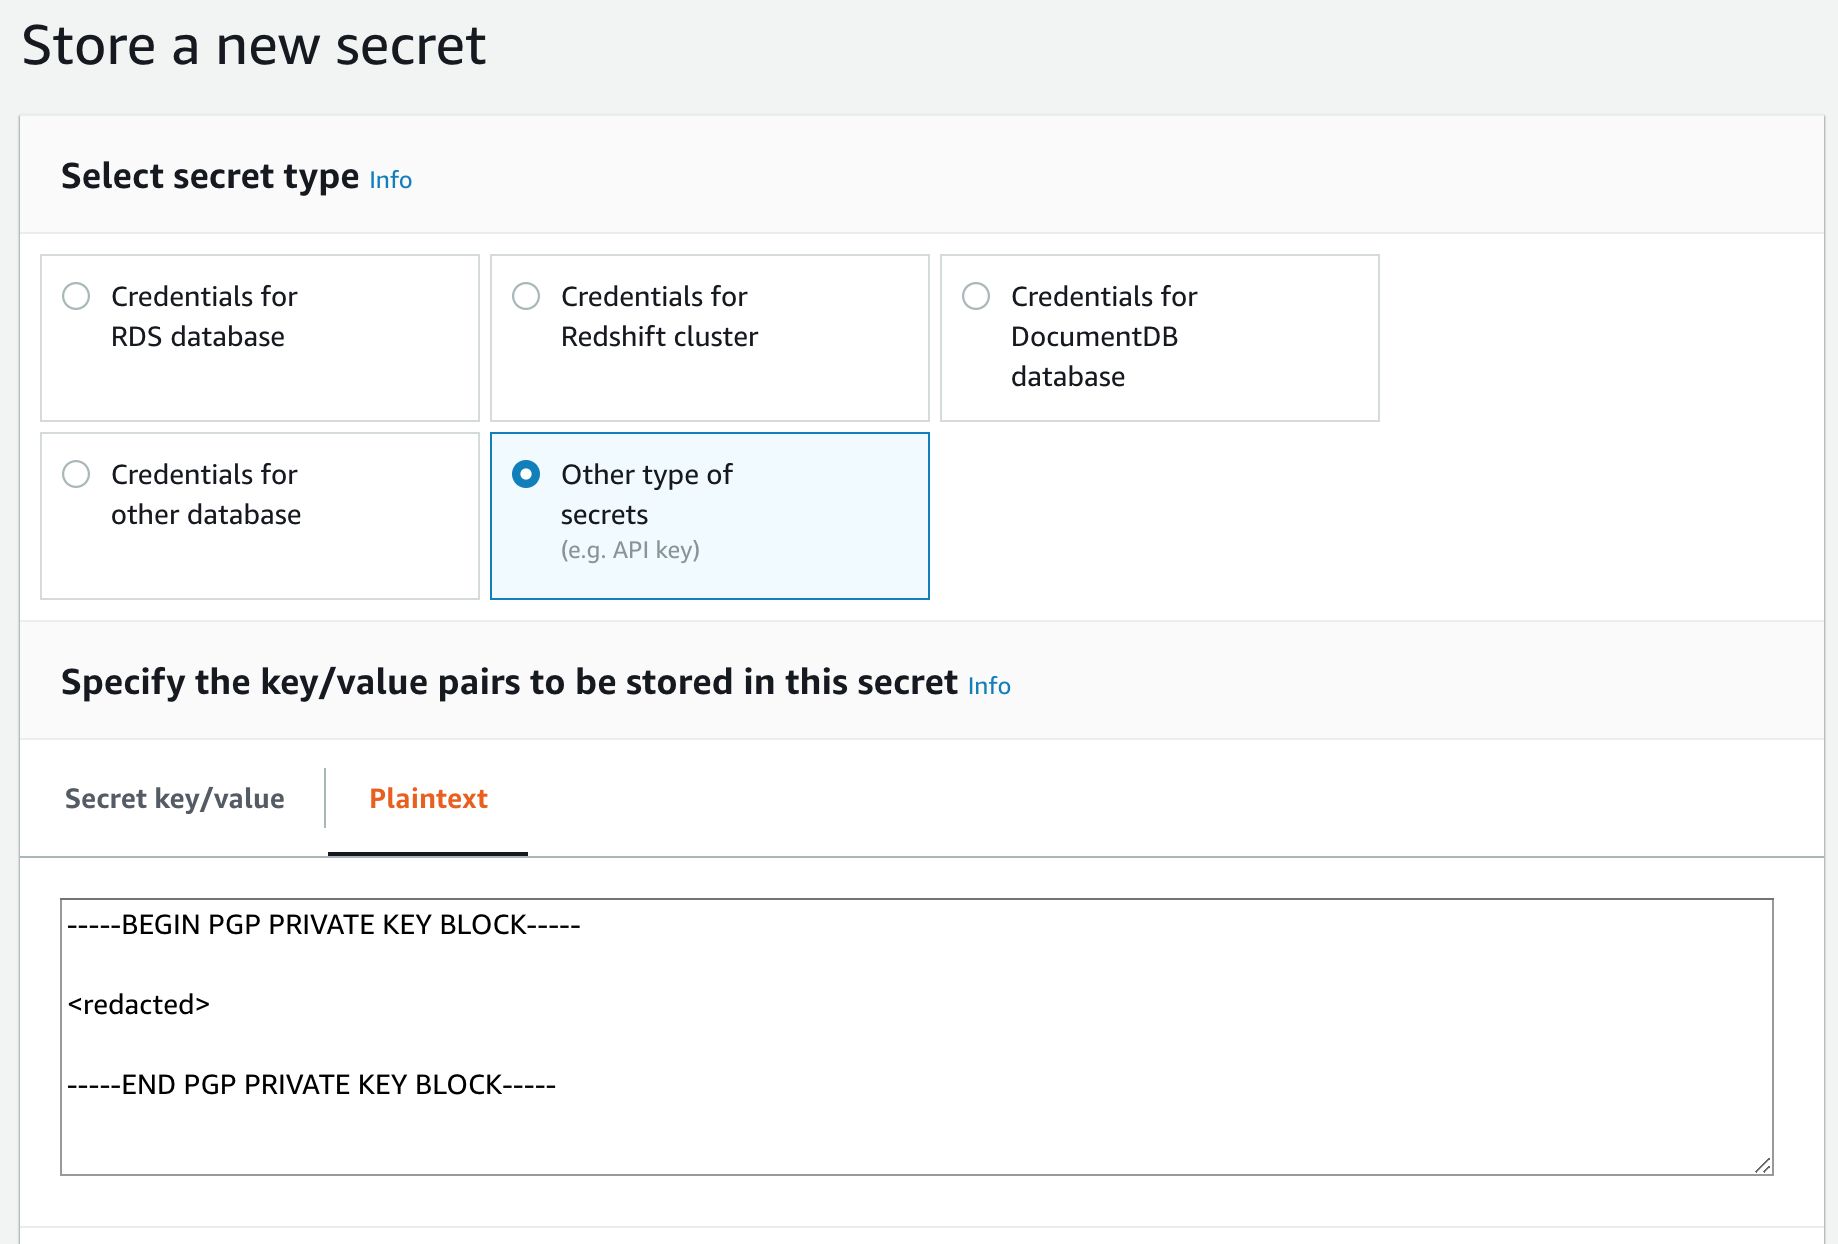
Create an AWS Secret containing the private GPG key following the AWS documentation for creating a basic secret
Note: The AWS Secret type must be Other type of secret, and the GPG key must be entered using the Plaintext tab, as shown in the screenshot below.

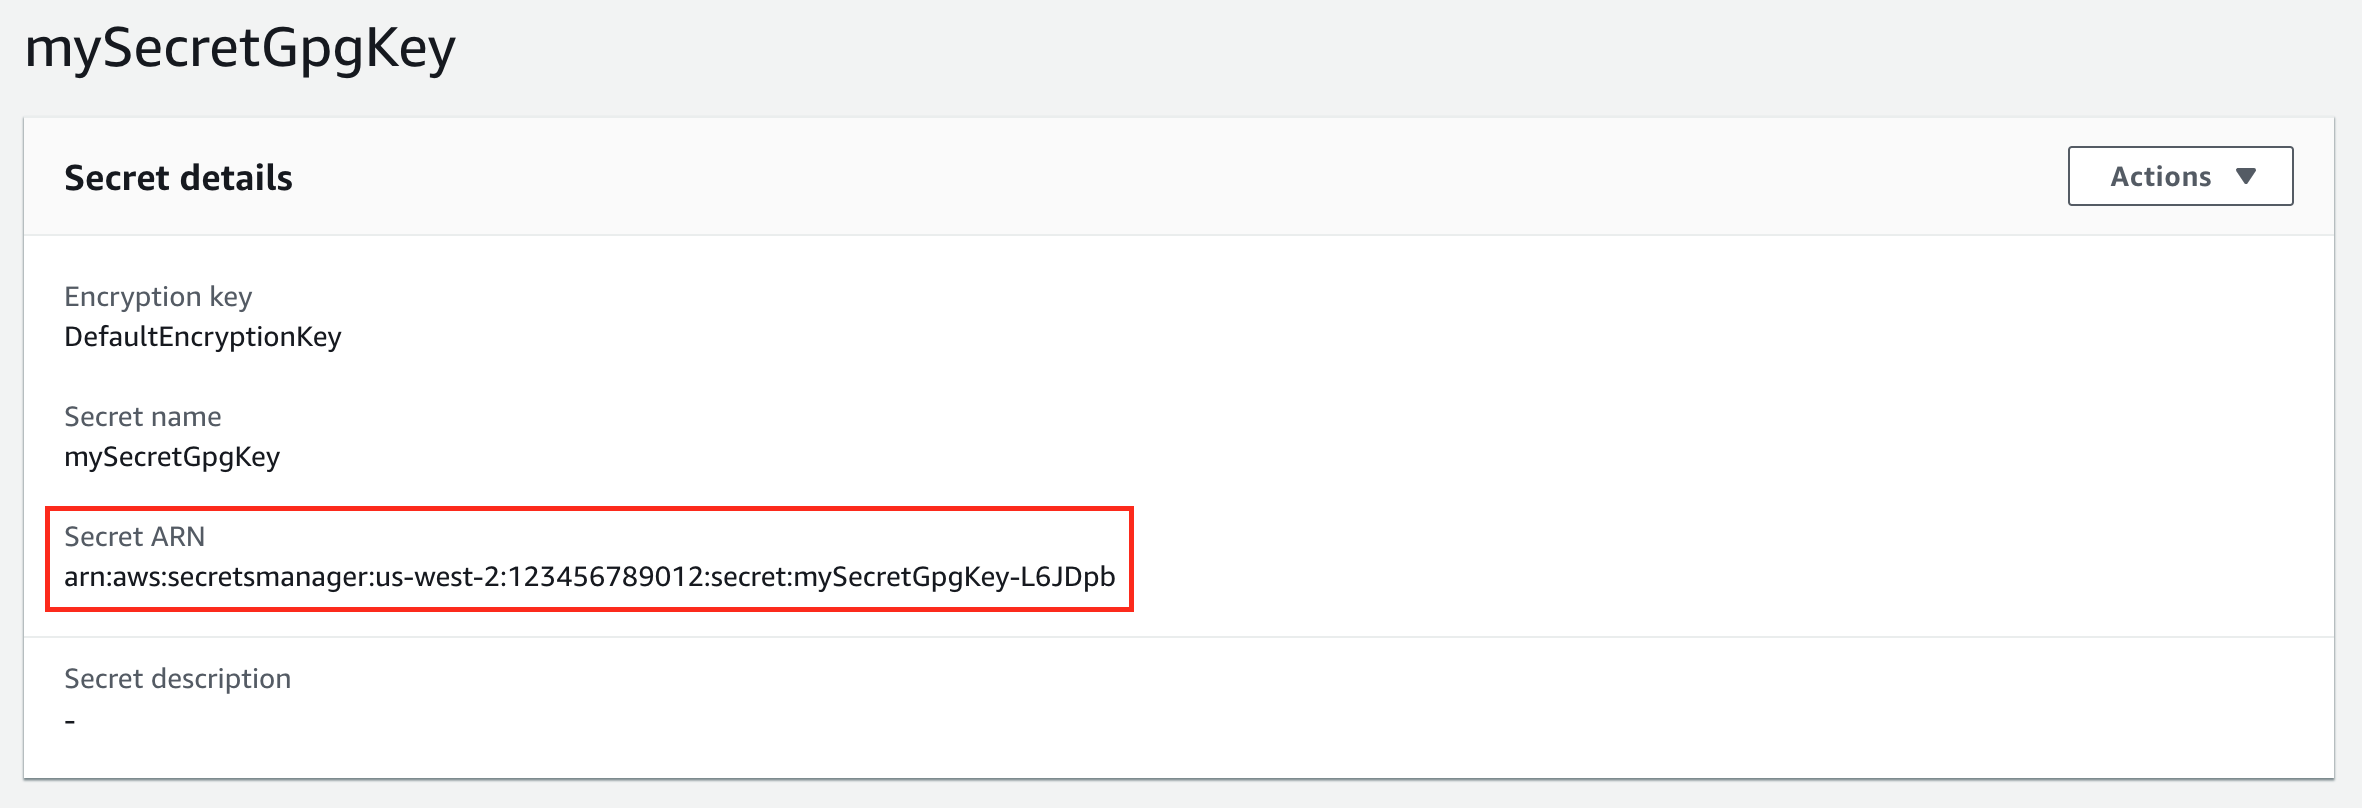
Note the ARN (Amazon Resource Name) of the AWS Secret

Repeat steps 1 to 3 with the private SSH key created in step 2 of section Creating the Git repository
Finding the public host key
Identify the hostname of the Git repository hosting service that you are using
Some common hosting services include:
github.comgitlab.combitbucket.org
Run
ssh-keyscanto fetch the public host key of the server$ ssh-keyscan github.com 2> /dev/null github.com ssh-rsa AAAAB3NzaC1yc2EAAAABIwAAAQEAq2A7hRGmdnm9tUDbO9IDSwBK6TbQa+PXYPCPy6rbTrTtw7PHkccKrpp0yVhp5HdEIcKr6pLlVDBfOLX9QUsyCOV0wzfjIJNlGEYsdlLJizHhbn2mUjvSAHQqZETYP81eFzLQNnPHt4EVVUh7VfDESU84KezmD5QlWpXLmvU31/yMf+Se8xhHTvKSCZIFImWwoG6mbUoWf9nzpIoaSjB+weqqUUmpaaasXVal72J+UX2B+2RPW3RcT0eOzQgqlJL3RKrTJvdsjE3JEAvGq3lGHSZXy28G3skua2SmVi/w4yCE6gbODqnTWlg7+wC604ydGXA8VJiS5ap43JXiUFFAaQ==Run the following command to generate the public fingerprint using the public key from step 2
$ ssh-keyscan github.com 2> /dev/null | ssh-keygen -lf -
2048 SHA256:nThbg6kXUpJWGl7E1IGOCspRomTxdCARLviKw6E5SY8 github.com (RSA)
Validate that you have the correct public host key by comparing the fingerprint with the Git hosting service’s documentation
Links to documentation containing fingerprints for common hosting services:
Sample Jenkins parameters
When running the Jenkins job DeployAuthorAndLive and following the examples in this section, the values for the Jenkins parameters required for injecting configuration would be:
AUTHOR_EP_COMMERCE_ENVNAMEisprod-authorLIVE_EP_COMMERCE_ENVNAMEisprod-liveEP_COMMERCE_CONFIG_REPOis the SSH URL to the newly created Git repositoryEP_COMMERCE_CONFIG_GPG_AWS_SECRET_ARNis the ARN of the AWS Secret containing the private GPG key created in the section Creating the AWS SecretsEP_COMMERCE_CONFIG_SSH_AWS_SECRET_ARNis the ARN of the AWS Secret containing the private SSH key created in the section Creating the AWS SecretsEP_COMMERCE_CONFIG_HOST_KEYis the validated host key from step 2 in the section Finding the public host key
Configuration Source Priority
Configuration for an environment is constructed in the following steps:
Files are copied from the default configuration folder in the Elastic Path Commerce code
Files are copied from an environment specific configuration folder in the Elastic Path Commerce code if one one exists, for example prod-live, overwriting any duplicate files
Files are copied from an environment specific configuration folder in an encrypted Git repository, for example prod-live, overwriting any duplicate files
The environment specific configuration folder is set in the Docker container by the environment variable EP_COMMERCE_ENVNAME.
For a single-instance deployment you can set this value using the Jenkins parameter EP_COMMERCE_ENVNAME in the Jenkins job DeploySingleInstance.
For an Author and Live deployment you can set these values using the Jenkins parameters AUTHOR_EP_COMMERCE_ENVNAME and LIVE_EP_COMMERCE_ENVNAME in the Jenkins job DeployAuthorAndLive.