Cortex Authorization
Apache Shiro is a role-based access control framework (RBAC). Shiro provides a dynamic security model where roles and permissions can be configured at run time.
Role Based Access Control works by restricting the CRUD (Create Read Update Delete) operations logged in users can perform on Cortex resources. Depending on a user’s role, they may only have permission to view (Read) a resource, or they may be able to insert (Create), update, or delete data through a resource.
Resource Authorization Workflow
When Cortex receives a request with an access token, it generates a Subject object. The subject represents the user’s log in state and contains a list of operations the user is authorized to perform.
When the request reaches the resource, the ResourceKernel verifies the Subject object and checks the user’s permissions. If the request has the proper permissions, the resource kernel forwards the request to the resource for processing. If the request does not have the proper permissions, a 401 or 403 status code is returned.
Configuring Bundle Permissions
Each Cortex Bundle must contain a permission.properties file. This file defines rules that Apache Shiro follows to determine whether the logged in user is allowed to perform the requested HTTP operation. If the operation is not allowed, Cortex will return a 401 Unauthorized response.
A sample permission.properties looks like the following:
relos.role.PUBLIC=ADVISE_READ,ADVISE_CREATE,ADVISE_UPDATE,ADVISE_DELETE,INFO:*;\
    LINK,READ:memberships:*;\
    LINK,READ:{base.scope}:default:*;
relos.role.OWNER=LINK,READ:{base.scope}:{carts.cart-id};
relos.role.READ_CUSTOM_CARTS=LINK,READ:{base.scope};\
    LINK,READ,CREATE:{base.scope}:form;\
    CREATE:{base.scope}:{carts.cart-id}:items:{base.scope}:*:form;\
    LINK,READ:{base.scope}:items:{base.scope}:*:list;
relos.role.MODIFY_CARTS=LINK,READ,CREATE,UPDATE,DELETE:{base.scope}:{carts.cart-id}:*;\
    LINK,READ,CREATE:items:{base.scope}:*:form;\
    CREATE:{base.scope}:*:form;
The \ character at the end of some of the lines above indicate that the line continues and a break has been added for readability.
Each line can be broken down as follows:

The sections below describe each of these parts.
Shiro Roles
Each Cortex API request is assigned a single Elastic Path role. An Elastic Path role is expanded into a collection of Shiro roles at runtime. A Shiro role is a granular access control that conveys a right to perform a particular business function.
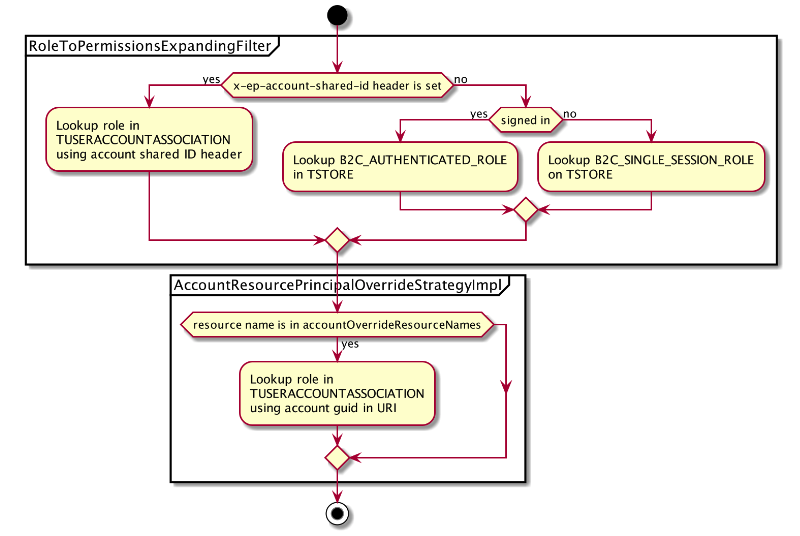
Cortex determines the effective role for each request as follows:
- If the
x-ep-account-shared-idheader is set:- Read the account user association record for the specified account and signed-in user.
- Set the role based on the role value in the record.
- If the
x-ep-account-shared-idheader is not set:- Read the store record for the current scope.
- If the user is single-session, set the role based on the single-session role in the record.
- If the user is registered, set the role based on the registered role in the record.
- Ensure that permissions for account resources are defined by the association to that account, regardless of the header. While processing Cortex resource permissions, if the name of Cortex resource is contained within the
accountOverrideResourceNameslist in theep-rs-authorization-epcommercebundle, then perform the following steps:- Read the account GUID from the
accounts.account-idparameter. - Read the account user association record for the account related to the account ID parameter and signed-in user. If the signed-in user is not associated to the account, read the account ancestors in order until an association is found.
- Set the role based on the role value in the record.
- Read the account GUID from the
The process above is also shown in the following activity diagram:

Out of the box, Cortex supports the following Elastic Path roles:
SINGLE_SESSION_BUYERThis role is typically assigned to unauthenticated users that are not transacting on behalf of an account.
LIMITED_CATALOG_BROWSERShoppers with the limited catalog browser role can view the catalog, but cannot add items to any shopping cart or see product prices.
CATALOG_BROWSERShoppers with the catalog browser role can view the catalog, including pricing, but cannot add items to any shopping cart.
BUYERShoppers with the buyer role can add items to cart and checkout, but cannot modify any aspects of the accounts they are assigned to.
BUYER_ADMINShoppers with the buyer admin role have full access to modify the accounts they are assigned to, including assigning new users to the account.
The following table shows the Shiro roles that are assigned to each Elastic Path role by default:
| Shiro Roles | Single-session Buyer | Limited Catalog Browser | Catalog Browser | Buyer | Buyer Admin |
|---|---|---|---|---|---|
| PUBLIC | x | x | x | x | x |
| REGISTERED | x | x | x | x | |
| READ_PRICES | x | x | x | x | |
| MODIFY_CARTS | x | x | x | ||
| READ_CUSTOM_CARTS | x | x | |||
| MODIFY_ACCOUNTS | x | ||||
| MODIFY_ACCOUNT_ASSOCIATES | x | ||||
| MODIFY_ACCOUNT_PAYMENT_INSTRUMENTS | x | ||||
| MODIFY_ACCOUNT_ADDRESSES | x |
To customize the Elastic Path roles or the assigned Shiro Roles, update the roleToPermissionsMap in the commerce-engine/core/ep-core/src/main/resources/spring/service/service.xml file.
note
When defining a permission.properties file, each Shiro role needs to be prefixed with 'relos.role.'. Any role defined without this prefix is ignored.
note
All users always have the PUBLIC and OWNER Shiro Roles. OWNER has no real purpose. The restrictions that ensure that users can only access resources they "own" are actually enforced by parameter strategies, which we will talk about later.
Avoid defining permission.properties files with relos.role.OWNER. Use relos.role.PUBLIC instead if all users should be able to perform the operation.
Roles Example
Assume that a user ends up with the CATALOG_BROWSER Elastic Path Role. This is expanded to the following Shiro Roles:
PUBLICOWNERREGISTEREDREAD_PRICES
Now assume that our bundle permission.properties file looks like this:
relos.role.PUBLIC=[OPERATIONS]:[URI_PATTERNS];
relos.role.OWNER=[OPERATIONS]:[URI_PATTERNS];
relos.role.READ_CUSTOM_CARTS=[OPERATIONS]:[URI_PATTERNS];
relos.role.MODIFY_CARTS=[OPERATIONS]:[URI_PATTERNS];
Our user will be able to perform all of the OPERATIONS for the specified URI_PATTERNS for PUBLIC and OWNER, but not READ_CUSTOM_CARTS or MODIFY_CARTS.
Operations
Operations define what type of request is being enforced. Cortex supports three different classes of operations: standard, advisors, and special.
Standard Operations
These operations control whether certain HTTP verbs are permitted.
READ: Specifies that the users can read from the resource. This is initiated by anHTTP GETrequest.CREATE: Specifies that the users can create new information in the resource. This is initiated by anHTTP POSTrequest.UPDATE: Specifies that the users can update data in the resource. This is initiated by anHTTP PUTrequest.DELETE: Specifies that the users can delete data from the resource. This is initiated by anHTTP DELETErequest.
Advisor Operations
These operations control whether the onAdvise method of Advisor classes are invoked to return messages.
ADVISE_READ: Specifies that any resource advisors should be executed onHTTP GET. Advisor responses are returned in the "messages" portion of the response.ADVISE_CREATE: Specifies that any resource advisors should be executed onHTTP POST.ADVISE_UPDATE: Specifies that any resource advisors should be executed onHTTP PUT.ADVISE_DELETE: Specifies that any resource advisors should be executed onHTTP DELETE.
note
The URI_PATTERNS advisor operations start with the resource name, unlike all other operations. Usually they are just defined with a wildcard, as in this example:
relos.role.PUBLIC=ADVISE_READ,ADVISE_CREATE,ADVISE_UPDATE,ADVISE_DELETE:*;
Special Operations
LINK: This operation defines whether links to theURI_PATTERNshould be rendered in a response. For links, theURI_PATTERNrepresents the target of the link, not the URI that the client is accessing.INFO: Provides meta information on a resource. Currently supports maximum age of a resource only.
URI Patterns
URI patterns are pattern matchers on the URI being accessed.
The URI patterns only match on the path after the base URI (i.e. https://cortex.elasticpath.com/cortex/) and bundle name (i.e. carts).
For example, if a client accesses https://cortex.elasticpath.com/cortex/carts/mobee/grsdim3cgfrwcljvme3taljugu4tqllbgqydkljwhbrtoyjrgbstgobzga=/items/mobee/qgqvhklbnruwk3s7onvxk=/form, only the mobee/grsdim3cgfrwcljvme3taljugu4tqllbgqydkljwhbrtoyjrgbstgobzga=/items/mobee/qgqvhklbnruwk3s7onvxk=/form portion is considered by the URI pattern matcher.
Parameter Strategies
URI patterns can contain placeholders called parameter strategies, which are enclosed in curly braces.
Parameter strategies are usually used to ensure that users can only access resources that they "own". For example, the carts.cart-id parameter restricts a user’s permissions so they only apply to the user’s own carts.
Out of the box, Cortex supports the following permission parameters. These are exclusive to a resource:
| Parameter | Description | Resource |
|---|---|---|
{addresses.address-id} | The user’s address | Addresses |
{carts.cart-id} | The user’s cart | Carts |
{emails.email-id} | The user’s email | Emails |
{orders.order-id} | The order associated with a user’s cart | Orders |
{paymentMethodId} | The user’s payment method | PaymentMethods |
{profiles.profile-id} | The user’s profile | Profiles |
{accounts.account-id} | Accounts that the user is associated to | Accounts |
{purchases.purchase-id} | The user’s purchase | Purchases |
{shipmentdetails.shipment-details-id} | The user’s shipment details | ShipmentDetails |
{wishlists.wishlist-id} | The ID of the user’s wishlist | Wishlists |
The following parameters are available for all resources:
{base.scope}- The scope of the store that the user belongs to.
Special Parameters
In addition to the parameter strategies described above, URI patterns can contain the following:
*: Wildcards are a pattern matcher that will match one or more path sections.EOL: By default, any URI pattern that matches the beginning of a URL will be accepted.EOLacts like an anchor so that the URI must match the entire pattern.{unauthenticated}: A parameter that preventsREGISTEREDfrom inheriting this permission fromPUBLIC. This is only available to theregistrationsresource. You must manually apply this parameter when you extend or change theregistrationsresource.
Assigning Multiple Permissions to a Role
Role permissions are defined on a single line. To assign multiple role operations and URI patterns, structure your permission assignment as shown:
To assign same URI pattern to multiple operations, separate operations with commas as shown:
ROLE=OPERATION_1,OPERATION_2:{URI_PATTERN}To assign multiple URI patterns to the same operations, separate URI patterns with colons as shown:
ROLE=OPERATION:{URI_PATTERN_1}:{URI_PATTERN_1}To assign different URI patterns to different operations, separate sets of operations and URI patterns with semicolons as shown:
ROLE=OPERATION_1:{URI_PATTERN_1};OPERATION_2:{URI_PATTERN_2}
Making Roles and Permissions Configurable at Runtime
To support the ability to configure your resource’s roles and permissions during runtime, modify your resource’s src/main/resources/spring/applicationContext-resource-server.xml:
With a text editor, open
applicationContext-resource-server.xmlModify the
overrideRolePermissionsProviderbean’spersistent-idto the name of the resource’s role and permissions configuration file.For example, in items:

Adding new Permission Parameter Strategies
Helix Resources
Permission parameters are configured in a Helix resource by extending the AbstractHelixModule class, and binding PermissionParameterStrategy to the class.
For more information, see Configuring Prototypes.
Legacy Resources
To add permission parameters to a custom legacy resource’s resource permissions, assign the parameter to a parameter strategy in the resource’s permissionParameterResolver.
The following steps show how to add a permissionParameterResolver to your custom resource:
With a text editor, open your resource’s
src/main/resources/spring/applicationContext-resource-server.xmlAdd constructor arguments to the
permissionParameterResolverbean to specify each parameter and its resolution strategyFor example, to define the
permissionParameterResolverfor aREAD:{base.scope}:{resourceFamilyId.resourceId}permission:<bean name="permissionParameterResolver" class="com.elasticpath.rest.authorization.parameter.PermissionParameterResolver"> <constructor-arg> <map> <entry key="scope" value-ref="scopeParameterStrategy"/> <entry key="resourceId" value-ref="yourResourceIdParameterStrategy"/> </map> </constructor-arg> </bean>
The scopeParameterStrategy is predefined in Cortex, but the custom yourResourceIdParameterStrategy needs to be implemented.
Out of the box,Cortex has the following parameter types and strategies:
- Scope:
ScopeParameterStrategy
Modifying the Roles and Permissions of an Existing Resource
Cortex resources have predefined roles and permissions. Configure an existing resource’s permissions by defining new permissions in a <Family_Name>RolePermissions.config file. Permissions take effect without having to restart Cortex.
note
When the Cortex detects a <Family_Name>RolePermissions.config file, the API ignores the resource’s predefined role permissions and applies only the permissions defined in the <Family_Name>RolePermissions.config file.
Configuring Role Permissions through the Felix Web Console
After creating your <Family_Name>RolePermissions.config file, you can modify your resource’s permissions through the Apache Felix Web Console.
note
Without a <Family_Name>RolePermissions.config file, you cannot modify your resource’s role permissions through the Felix Web Console.
To configure your permissions through the Felix Web Console:
Log into the Felix Web Console:
Navigate to
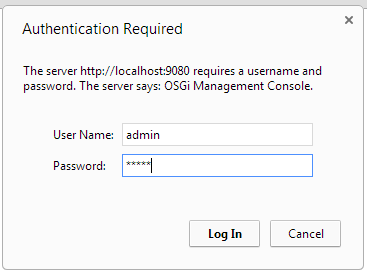
http://[server]:[port]/system/console/configMgr. If Cortex is running locally at port8080, the URL ishttp://localhost:8080/cortex/system/console/configMgr.Enter the User Name and Password in the Authentication dialog box:

The default credentials are as follows:
- Username:
admin - Password:
admin
- Username:
Set the permissions:
- Click
<Resource Name>RolePermissions

- Modify your resource’s role permissions.

- Click Save
- Click
Permissions save to the <Family_Name>RolePermissions.config file will take effect immediately.
