Cortex Authentication
Cortex Authentication
Cortex uses OAuth2 (Open Authorization) is the open standard for token based authentication and authorization. OAuth2 allows a user's account information to be used by third-party services, such as Facebook, without exposing the user's password. OAuth2 can also act as an intermediary on behalf of the end user, providing the service with an access token that authorizes specific account information to be shared. The process a client application follows for obtaining the token is called a flow or grant type. There are four grant types defined in the standard:
- Authorization Code
- Implicit
- Resource Owner Password Credentials
- Client Credentials
Customization and Configuration
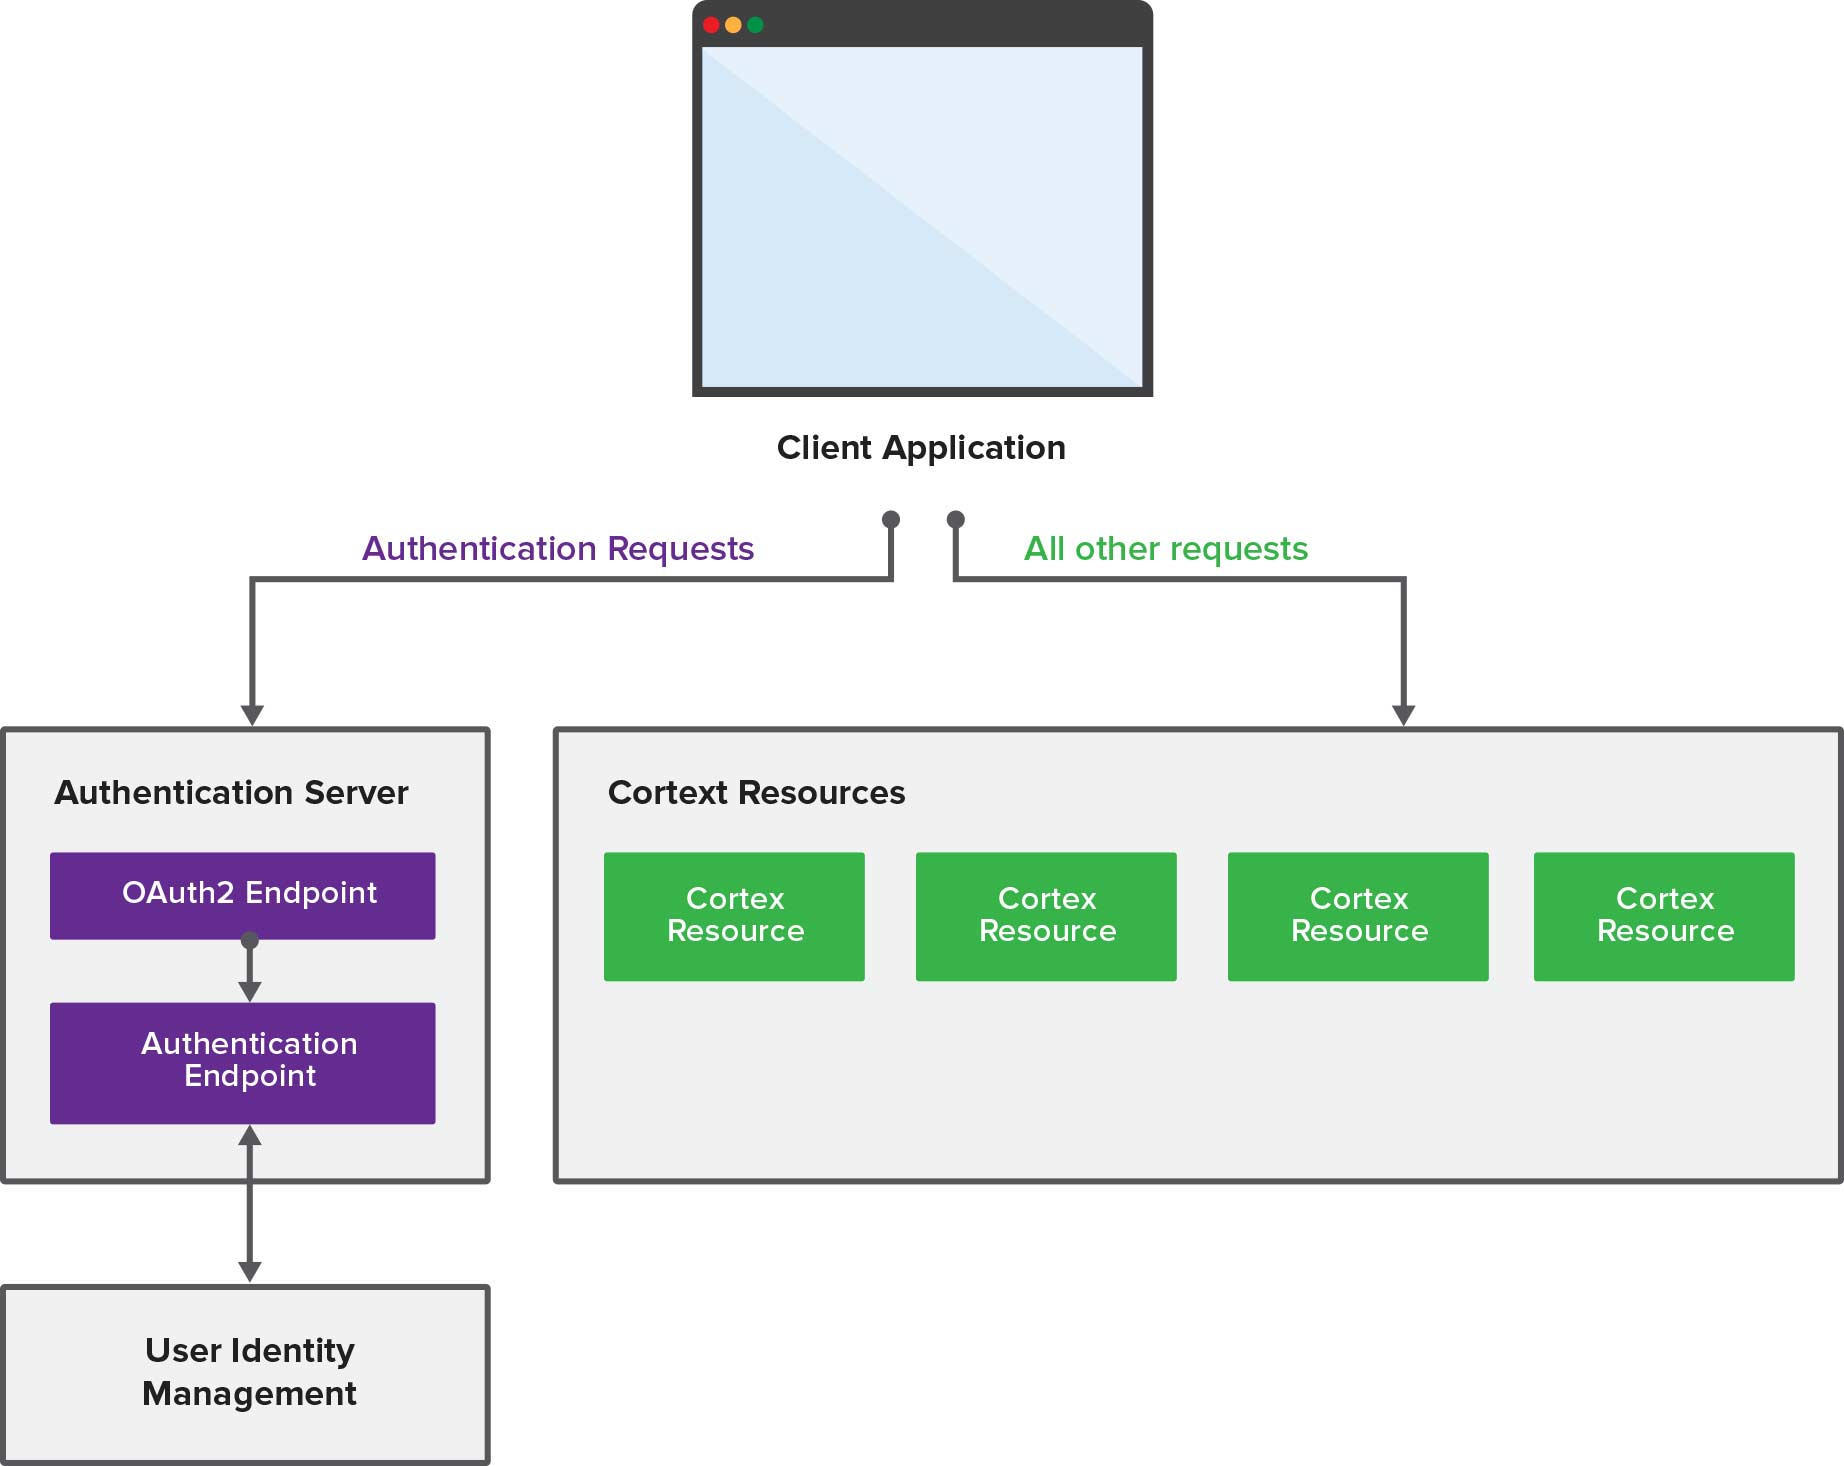
The Cortex provides an authentication server that allows client applications to exchange a user's credentials for an OAuth2 access token. The authorization server is made up of multiple components:
- An OAuth2 authentication endpoint to generate and validate OAuth2 tokens.
- A generic authentication endpoint to validate authentication requests when the OAuth2 endpoint is handled by another system.
- An integration to a user identity management system to validate user credentials.
An overview of how the components work is as follows:

Integrating with an alternate OAuth2 Provider
The recommended approach for deploying Cortex in a production environment is to restrict access with an API Gateway installed in the DMZ. Typically, an API Gateway has services for providing authentication endpoints, such OAuth2, and integrating with user identity management systems. If out-of-the-box OAuth2 implementation does not meet your needs, you can uninstall it and implement your own following the instructions below.
Uninstalling the default OAuth2 Provider
- In your Cortex web application's pom.xml, comment out the following dependencies:
<dependency>
    <groupId>com.elasticpath.rest.relos.rs.authentication</groupId>
    <artifactId>ep-rs-authentication-spring-oauth2</artifactId>
    <scope>provided</scope>
</dependency>
<dependency> <groupId>com.elasticpath.rest.relos.rs.authentication</groupId> <artifactId>ep-rs-authentication-spring-oauth2-epcommerce</artifactId> <scope>provided</scope> </dependency> - In your Cortex web application's pom.xml, comment out the following artifactItems:
<artifactItem>
    <groupId>com.elasticpath.rest.relos.rs.authentication</groupId>
    <artifactId>ep-rs-authentication-spring-oauth2</artifactId>
</artifactItem>
<artifactItem> <groupId>com.elasticpath.rest.relos.rs.authentication</groupId> <artifactId>ep-rs-authentication-spring-oauth2-epcommerce</artifactId> </artifactItem> - Rebuild your Cortex web application.
Trust Headers
The API Gateway must be configured with the Authentication Endpoint's trust header to be authorized to authenticate incoming client requests. We recommend you configure the trust header of your Cortex's Authentication Endpoint, see Configuring Shared Secret for Trusted Sources
Below is an example of the authentication workflow from the API Gateway's perspective:
POST https://www.myapi.net/authentication/user
Content-Type: application/json
x-ep-trust-header: <secret trust header>
{"username":"oliver.harris@elasticpath.com","password":"password","scope":"mobee","role":"REGISTERED"}
Successful HTTP/1.1 200 SUCCESS
Date: Fri, 09 May 2013 16:01:30 GMT
Content-Length: 81
Content-Type: application/json
Cache-Control: no-store
{
"x-ep-user-id": "67E280AC-7E86-32A3-59B2-610FF2CA38DD",
"x-ep-user-roles": "REGISTERED",
"x-ep-user-scopes": "MOBEE"
} Unsuccessful HTTP/1.1 401 UNAUTHORIZED Date: Mon, 16 May 2013 19:53:25 GMT Content-Type: text/plain
Configuration Settings
Configuring Authentication Endpoint
The Authentication URI endpoint must be configured to authenticate customers on Cortex. The authentication endpoint is defined in the authClientHost.cfg configuration file. To create and configure this file, follow the instructions below.
- In your C:/etc/ep/cortex/system/config directory, create a file named authClientHost.cfg
- In the authClientHost.cfg file, add the following field and define the authentication endpoint URI:
DEFAULT_HOST=http://localhost:9080/cortex/authentication/user
telco=http://localhost:13080/cortex/authentication/user
DEFAULT_HOST=http://localhost:9080/cortex/authentication/user
Configuring OAuth2 Token Expiration
By default, the Cortex authentication tokens expire after 1 week (60 * 60 * 24 * 7 seconds). The expiration time is configured through a tokenExpiry.config file. Once this file is created, Cortex ignores the default token expiration settings and applies the configuration defined in this file. Changes take effect immediately without having to restart Cortex.
Configuring Token Expiration through the File System
- Create the following directory if it doesn't already exist:
- For Windows: C:/etc/ep/cortex/system/config/permissions
- For Linux: /etc/ep/cortex/resources/config/permissions
- In the permissions directory, create a file named tokenExpiry.config
- In the tokenExpiry.config file add the following field and define the expiration time in seconds:
relos.token.expiry.SECONDS="token expiry seconds"
Configuring Token Expiration through the Felix Web Console
You can configure token expiration time through the Apache Felix web console. Be aware the tokenExpiry.config must exist in the file system before you can configure it through Apache Felix. Follow the instructions in the section above to create the tokenExpiry.config file.
- Start your Cortex.
- Navigate to http://<API server>/system/console/configMgr. If Cortex is running on a local server at port 8080, the URL is http://localhost:8080/cortex/system/console/configMgr
- Log in to the Felix Web Console. The default credentials are:
Username admin Password admin - Click tokenExpiry.

- Modify your access token's expiration time.

- Click Save
- The configuration saves and takes effect immediately.

