Post Bootstrap Tasks
Update DNS Name Servers
The bootstrap process creates a DNS zone within the cloud being used. To get DNS lookups working against the bootstrapped environment, you must create a NS (name server) record. Create a NS with the DNS provider that controls the parent domain of the domain name chosen during bootstrapping CloudOps for Kubernetes.
For example, you control the domain mycompany.com and if the TF_VAR_domain value of the docker-compose.override.yml file used during the bootstrap process is set to epc-dev.mycompany.com. Create a NS record in the DNS servers for mycompany.com. This points the NS record to the Amazon Route53 DNS servers listed in the NS record in the DNS zone that serves records for epc-dev.mycompany.com.
If you are using CloudOps for Kubernetes to acquire a publicly signed SSL certificate, you must re-run docker-compose up --force-recreate. Do this after updating the DNS nameservers and before deploying any other Elastic Path infrastructure. If you do not perform this step, your bootstrap workspace might enter an inconsistent state, preventing you from re-running docker-compose up --force-recreate later to acquire updates.
Find Name Server Values Using AWS Console
To find the name server values through the AWS Route53 console, refer to the DNS zone resource created by the bootstrap process as shown in the following image:
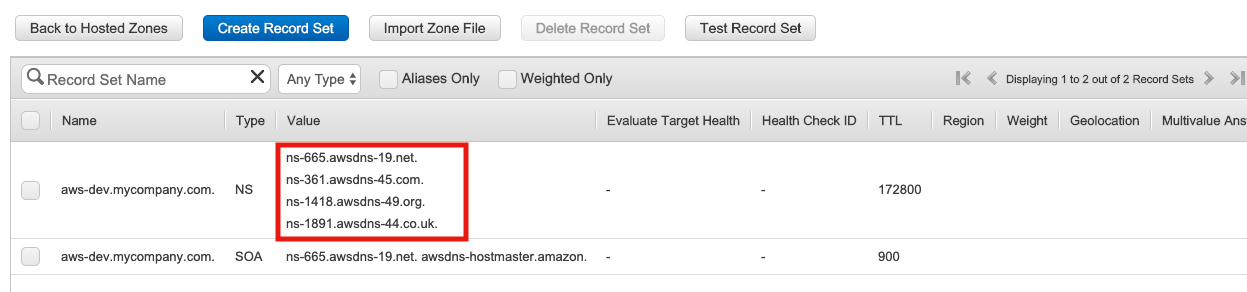
Finding the Name Server Values Using AWS CLI
To find the name server values of your DNS zone using the AWS CLI:
-
Look up the ID of the AWS Route53 hosted zone created during initial setup.
- This ID can be found by examining the Route53 hosted zone record in the AWS Route53 console.
- It is also captured in the output of the
docker-compose up --force-recreatecommand asaws_route53_zone_id, when that command is run withTF_VAR_bootstrap_modeset to eithersetuporshow. - You can also use the
aws route53 list-hosted-zonesAWS CLI command to find the Zone ID - use the string after the last/in the value forId.
-
Run the following command, adjusting the parameter values as you require:
aws route53 get-hosted-zone --id <aws_route53_zone_id>- Where the
<aws_route53_zone_id>is the Route53 hosted zone ID found in the previous step.
The output of the
aws route53 get-hosted-zonecommand should look similar to the following:{"HostedZone": {"Id": "/hostedzone/Z8L2YASH0EP3DV","Name": "aws-dev.mycompany.com.","CallerReference": "terraform-201905164829483200000001","Config": {"Comment": "Managed by Terraform","PrivateZone": false},"ResourceRecordSetCount": 3},"DelegationSet": {"NameServers": ["ns-1300.awsdns-34.org","ns-513.awsdns-00.net","ns-448.awsdns-56.com","ns-1706.awsdns-21.co.uk"]}} - Where the
Log On To the Kubernetes Cluster
One useful tool for managing resources inside Kubernetes cluster is kubectl. It allows users to:
- View and edit the configuration of resources deployed into Kubernetes
- Show lifecycle events for Kubernetes resources
- View container logs
- Run commands inside running containers
- Create secure tunnels from a developer workstation to ports on running containers
To use kubectl, you must first log on to the Kubernetes cluster.
Logging On To EKS Cluster
To log on to the EKS (Elastic Kubernetes Service) cluster:
-
Collect the following values from the
docker-compose.ymlfile used by the bootstrap process:- TF_VAR_aws_access_key_id
- TF_VAR_aws_secret_access_key
- TF_VAR_kubernetes_cluster_name
- TF_VAR_aws_region
-
Configure the AWS CLI with a profile that uses the same
TF_VAR_aws_access_key_idandTF_VAR_aws_secret_access_keyvalues from the previous step. -
Run the following command, substituting values for the parameters as shown:
aws eks update-kubeconfig
  --name value_from_TF_VAR_kubernetes_cluster_name
  --profile=profile_name_from_second_step
  --region value_from_TF_VAR_aws_region
An alternative to using the AWS CLI is the eksctl command. The following example using eksctl command:
eksctl utils write-kubeconfig
  --profile=profile_name_from_second_step
  --name value_from_TF_VAR_kubernetes_cluster_name
  --region value_from_TF_VAR_aws_region
Accessing Nexus
A Nexus 2 pod is deployed into the Kubernetes cluster as part of the bootstrap process. This Nexus server is used to cache artifacts from external Maven repositories and to store Elastic Path artifacts.
To access the Nexus server:
- Complete the steps in Updating DNS Name Servers
- Collect the TF_VAR_domain and the TF_VAR_kubernetes_cluster_name settings in the docker-compose.yml file for the bootstrap container
- Substitute the settings value into a URL with the format
https://nexus.central<TF_VAR_kubernetes_cluster_name>.<TF_VAR_domain>/nexus- For example, if
TF_VAR_kubernetes_cluster_nameishubandTF_VAR_domainisep.cloud.mycompany.com, the Nexus URL would become:https://nexus.centralhub.ep.cloud.mycompany.com/nexus
- For example, if
For information about the Nexus login credentials, see Login Credentials.
Accessing Jenkins
A Jenkins server is also deployed during the bootstrap process. To access the web UI for Jenkins.
-
Ensure that you have completed the steps listed in the Updating DNS Name Servers documentation.
-
Collect the
TF_VAR_domainandTF_VAR_kubernetes_cluster_namesettings provided in thedocker-compose.ymlfile for the bootstrap container -
Substitute these values into a URL with the format
http://jenkins.central<TF_VAR_kubernetes_cluster_name>.<TF_VAR_domain>.For example: if
TF_VAR_kubernetes_cluster_nameishubandTF_VAR_domainisep.cloud.mycompany.com, the Jenkins URL would become:http://jenkins.centralhub.ep.cloud.mycompany.com.
For information about the Jenkins login credentials, see Login Credentials.
If you access Jenkins immediately after the bootstrap process completes, you will see a Jenkins job named bootstrap running. This job is responsible for populating the Jenkins server with the other jobs and for triggering the build of the Jenkins agent container images. You can find the source for the bootstrap job in Jenkins at: cloudops-for-kubernetes/jenkins/jobs/bootstrap/bootstrap.groovy.
Next Steps
With the post-bootstrap tasks complete, continue on to building the deployment package