Deploying Self Managed Commerce
After the infrastructure is setup, you are ready to start deploying Self Managed Commerce.
Prerequisites
Ensure that you complete the following tasks before proceeding to deploy a Self Managed Commerce environment using CloudOps for Kubernetes:
- Complete the CloudOps for Kubernetes bootstrap process and post-bootstrap tasks
- Build the required Self Managed Commerce artifacts
- Deploy the Apache ActiveMQ service
- Create and populate the Self Managed Commerce database
For more information about these prerequisites, including any links to the required documentation, see the Deploy Commerce Overview section.
Deploying Self Managed Commerce
The Jenkins Job used to deploy the Self Managed Commerce stack is called deploy-or-delete-commerce-stack.
When running this Jenkins job, you will be presented with a large number of parameters that allow you to refine and alter the configuration of the Self Managed Commerce stack to meet varying requirements. The following sections describes about some of the configuration options and choices.
Creating Ingresses
Ingresses define whether the Self Managed Commerce can be reached from outside the Kubernetes cluster via the load balancer. When ingresses are enabled, certain services will be exposed via the load balancer, with allow lists, that you can leverage to refine how the services are exposed. The default value in the allow lists is 127.0.0.1/32, and that will block all public access. You cannot access your applications through the DNS endpoints unless Ingresses are created and your CIDRs are in the allowedCIDRs job parameters.
In the rare case where you want to expose a service to the open Internet, an additional parameter will need to be set to confirm this. The allowOpenAccess job parameter must be set to true if any of the allowedCIDRs job parameters contain the CIDR 0.0.0.0/0 (the open Internet).
Attempting to create Ingresses with no value in allowedCIDRs results in a failed deployment. We recommend testing that the annotation is working correctly.
Create Horizontal Pod Autoscalers
This option deploys an Elastic Path stack with Horizontal Pod Autoscalers. For more information, see Horizontal Pod Autoscalers.
Create a deployment information page
This option deploys a deployment information page service in the namespace. The deployment information page is a web page that contains helpful Kubernetes cluster details, database details, and links to the deployed Self Managed Commerce services. For more information, see the Example Information Page image.
The deployment information page is not secured beyond IP whitelisting. It is intended for use with test environments. Do not deploy alongside production environments.
Choosing to create the Deployment Information Page exposes the ActiveMQ admin console to the public internet according to the whitelist-source-range set during configuration, with no additional security.
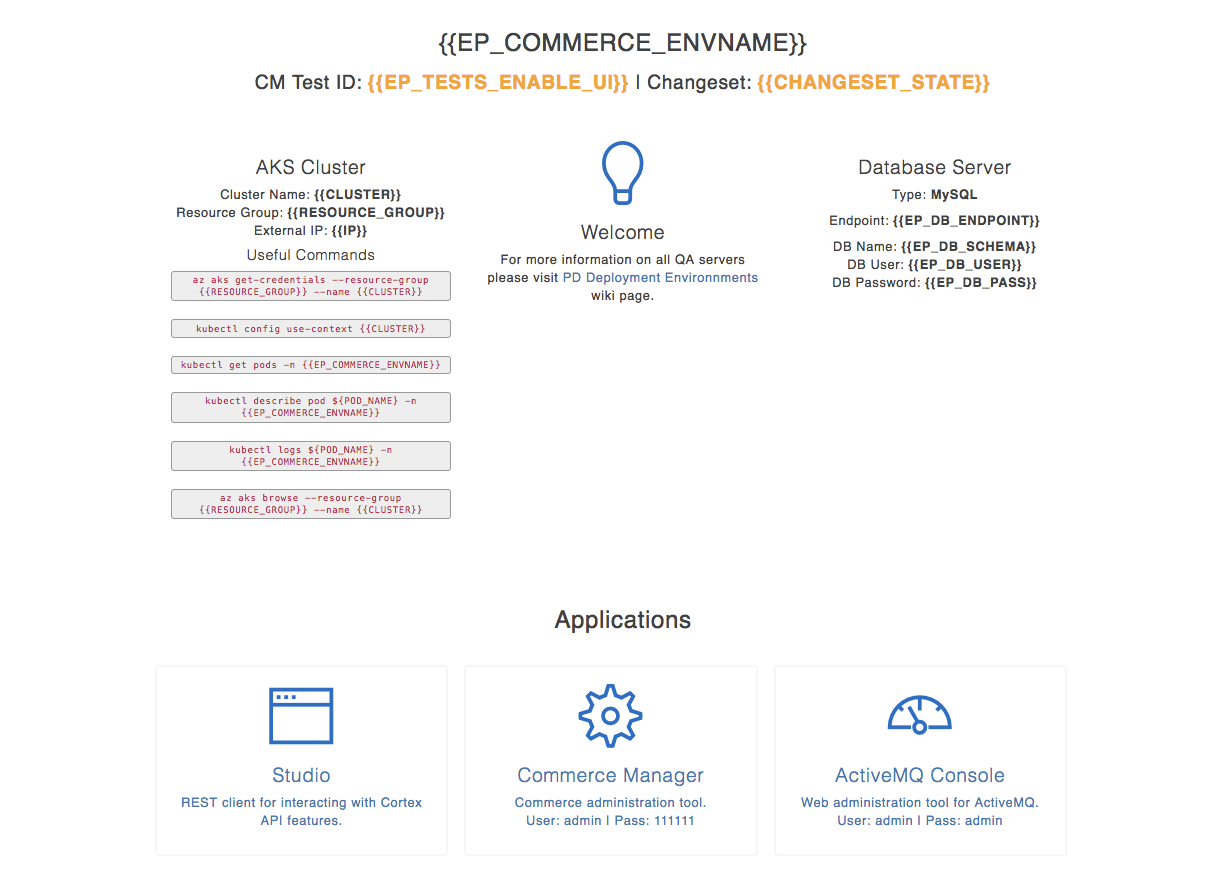
The path to the information page from root DNS for your deployment is defined as ${kubernetesNickname}.commerce${clusterName}.${dnsZoneName}/.
Deploy with UI tests enabled
This option deploys the Commerce Manager service so that you can run the provided Selenium tests against the service. This would be useful to deploy in QA environments if you are customizing Commerce Manager and want to run the Selenium tests against Commerce Manager.
Deploy with change sets enabled
This option deploys Self Managed Commerce with change sets enabled. This is typically configured in authoring environments where you prepare or review pre-production data. With this option enabled, you can later publish the change sets from the authoring environment to the live environment.
For more information about Change Sets, see Change Sets in the Self Managed Commerce documentation.
Deploy the Data Sync Tool
This option deploys the Data Sync Tool (DST) as a command-line tool and as a Java application. You would typically deploy the DST in an authoring environment; the tool is used to publish change sets from the authoring environment to the live environment.
For more information about the Data Sync Tool, see Data Sync Tool in the Self Managed Commerce documentation.
Deploy with JMX enabled
This option allows connections to JMX for the Self Managed Commerce applications with a Java profiler. For more information, see the Application Debugging documentation.
Deploy with debug enabled
This option allows connections to the JVM in debug mode from your IDE. For more information, see the Application Debugging documentation.
Deploy with different resourcing profiles
This option deploys an Elastic Path stack under a specific resourcing profile. CloudOps for Kubernetes provides the default resourcing profiles, dev, and prod-small. Details on the resources assigned for each application are under each resourcing profile in cloudops-for-kubernetes/terraform/commerce-stack/env-file. When creating your custom resourcing profile, use the existing dev.tfvars and prod-small.fvars files as templates.
There are two ways to add custom resourcing profiles when deploying an Elastic Path stack.
-
Add a custom
tfvarsresourcing profile file in your CloudOps for Kubernetes Git repository:-
Add your custom resourcing profile to the
cloudops-for-kubernetes/terraform/commerce-stack/env-filedirectory. -
Push your changes to the CloudOps for Kubernetes repository and branch used by the Jenkins job
deploy-or-delete-commerce-stack. -
Run the Jenkins job
deploy-or-delete-commmerce-stackwith the Jenkins parameterepStackResourcingProfileset to the name of your custom resourcing profile. Do not include the file extension for this parameter.
-
-
Use a custom
tfvarsresourcing profile from an external Git repository:-
Run the docker-compose process in
setupmode with the parameterTF_VAR_bootstrap_extras_propertiesin the docker-compose override file using the same format as the example below. Replace the example values with the appropriate values.noteDo not include the root Git repository directory in
env_file_path.TF_VAR_bootstrap_extras_properties: >{"git_repos": {"extras-repo": {"repo_url": "<GIT_REPOSIORY_SSH_URL>","default_branch": "<GIT_REPOSITORY_BRANCH>","env_file_path": "<PATH_TO_THE_RESOURCING_PROFILE_DIRECTORY>"}}} -
Run the Jenkins job
deploy-or-delete-commmerce-stackwith the Jenkins parameterepStackResourcingProfileset to the name of your custom resourcing profile. Do not include the file extension for this parameter.
-
Jenkins job deploy-or-delete-commerce-stack Parameters
containerUser
Indicates whether the Self Managed Commerce container images were built to run as the root user or the non-root user. It cannot be empty.
Set to non-root if the container images were built to run as non-root (for example, they were built with release 4.2.x or newer of the Elastic Path Docker repository).
Set to root if the container images were built to run as root (for example, they were built with release 4.1.x or earlier of the Elastic Path Docker repository).
plan_mode
When selected, this runs Terraform in plan mode and prompts you to approve changes before you continue. This works in both the deploy and delete modes.
deleteStack
When selected, this deletes the stack instead of creating it.
epStackResourcingProfile
This parameter is the resourcing profile of your ep-stack. By default, CloudOps for Kubernetes provides prod-small and dev profiles.
For more information about adding custom resourcing profiles, see the Deploy with different resourcing profiles section.
restartApps
By default, when you update a Self Managed Commerce deployment with the same image tag, deployments are not restarted. To restart the Self Managed Commerce deployments, set this parameter to true.
cloudOpsForKubernetesRepoURL
The Git repository URL of the cloudops-for-kubernetes code.
cloudOpsForKubernetesBranch
The branch of cloudops-for-kubernetes to use.
epEnvironment
The type of environment and configuration of your ep-stack, such as CI, production or staging.
dockerImageTag
The tag of the ep-app container images to use.
includeMockService
Create, update, or delete the Wiremock (mock) service. Wiremock is a tool used in Self Managed Commerce development and test environments. For more information about the Wiremock service, see the Self Managed Commerce Git repository, under <ep-commerce>/extensions/http-mock-server.
kubernetesNickname
This job uses the value of kubernetesNickname as the Kubernetes namespace where the Self Managed Commerce stack is deployed, and in the domain name of the Self Managed Commerce stack. This nickname must match the nickname used by the populated MySQL database and ActiveMQ services that you previously deployed and want the Self Managed Commerce stack to use.
If you specify a nickname and namespace value where a Self Managed Commerce stack is already deployed, then that stack will be updated.
includeIngresses
Creates or deletes Ingresses to allow connections from the network CIDR values in the allowedCIDRs for the Commerce services.
cmAllowedCIDRs
The network CIDR allowed to access the Self Managed Commerce Manager service. If includeIngresses is not selected, this parameter does nothing.
cortexAllowedCIDRs
The network CIDR allowed to access the Cortex service. If includeIngresses is not selected, this parameter does nothing.
integrationAllowedCIDRs
The network CIDR allowed to access the Integration service. If includeIngresses is not selected, this parameter does nothing.
studioAllowedCIDRs
The network CIDR allowed to access the Studio service. If includeIngresses is not selected, this parameter does nothing.
infoAllowedCIDRs
The network CIDR allowed to access the information page. If includeIngresses and includeDeploymentInfoPage are not selected, this parameter does nothing.
allowOpenAccess
Verification that you are deploying Self Managed Commerce services with the Jenkins job parameters allowedCidrs set with the CIDR 0.0.0.0/0. Set this parameter to true to acknowledge that you allow the Self Managed Commerce services to be accessible by the open internet.
includeHorizontalPodAutoscalers
Creates or deletes horizontal pod autoscalers. It automatically scales the number of pods in the deployment based on CPU usage. The default setting is false.
includeDeploymentInfoPage
Creates or deletes a page displaying the cluster details, database details and links to the deployed applications. The default setting is false.
enableUITests
If set to true, UI tests are enabled for the deployment. The default setting is false.
epChangesetsEnabled
If it is set to true, it enables changeset for deployment. The default setting is false.
deployDstWebapp
Deploys or deletes the Data Sync tool webapp. The Data Sync Tool (DST) can only be deployed if epChangesetsEnabled is true and the stack is Self Managed Commerce 7.5 or later.
kubernetesTargetNickname
The Kubernetes namespace of the target database that the DST pushes changes to. Leave empty if deployDstWebapp is set to false.
dnsZoneName
The domainName set in the docker-compose.yml file used during bootstrap. If the DNS settings for the domain are manually configured, the dnsZoneName can be overridden.
clusterName
The name of the Kubernetes cluster to deploy the ep-stack into. The clusterName is also the name of the A record and part of the full DNS name of the ep-stack.
includeAWSSES
If the cloud platform is AWS, when checked, the job deploys the Self Managed Commerce stack with AWS Simple Email Service (SES) email settings. This job only can run if setup-AWS-SES is run before with the same kubernetesNickname value.
smtpHost
If includeAWSSES is false and you want to use an external SMTP server, provide the address of the external SMTP server. For example, if you are using SendGrid as an SMTP service provider, the value is smtp.sendgrid.net.
smtpPort
If includeAWSSES is false and you want to use an external SMTP server, provide the port number of the external SMTP server. For example, if you are using SendGrid as an SMTP service provider, you could enter a value of 587.
smtpScheme
If includeAWSSES is false and you want to use an external SMTP server, provide the scheme of the connection to the external SMTP server.
Use one of the following schemes when connecting to the SMTP server:
smtp: for a plaintext SMTP connectionsmtps: for SMTP wrapped in SSL
smtpUser
If includeAWSSES is false and you want to use an external SMTP server, provide the username for the connection to the external SMTP server.
smtpPass
If includeAWSSES is false and you want to use an external SMTP server, provide the password for the connection to the external SMTP server.
enableJmx
This enables connecting to the app JMX ports. The default setting is false. For more information about connecting to JMX see the Application Debugging documentation.
enableJmxAuth
This enables JMX user and password authentication and generates a unique user and password combination that is added to the Kubernetes secret associated with the Self Managed Commerce deployment. The default setting is false. For more information about connecting to JMX see Application Debugging.
enableDebug
This enables connecting to the application Java Virtual Machine (JVM) debug ports with the remote debugger of your IDE. The default setting is false.
Validating Deployment
The deploy-or-delete-commerce-stack job can take approximately 15-30 minutes to complete as it waits for the stack to become available. Follow the below procedure to validate the Commerce stack deployment after the job has completed successfully.
Procedure
-
Open the Kubernetes dashboard and select the namespace you used when you ran the
deploy-or-delete-commerce-stackJenkins job.tipIf you require, use the directions to login to the dashboard: Accessing Kubernetes Dashboard.
noteDuring the stack startup, Deployments, Services, and Pods in the Kubernetes dashboard show an error that the readiness probes are failing. These error messages are normal during startup and go away as the services become available.
-
Validate that the following Deployments are present:
ep-activemq-deploymentep-cm-deploymentep-integration-deploymentep-searchmaster-deploymentep-searchslave-deploymentep-cortex-deploymentep-batch-deploymentep-data-sync-deployment(ifdeployDstWebappis true)
-
Validate that the following Services are present:
ep-activemq-serviceep-cm-serviceep-integration-serviceep-searchmaster-serviceep-searchslave-serviceep-cortex-serviceep-batch-serviceep-data-sync-service(ifdeployDstWebappis true)
-
If
deployDstWebappis true, validate that a secret namedtarget-database-secretsexists. -
Run the
run-cortex-system-testsJenkins job on the stack to validate that the Elastic Path stack is operational.For more information about the job, see the
run-cortex-system-testsjob section.
Accessing the Self Managed Commerce environment
For information on accessing the applications and components of the Self Managed Commerce environment, see Accessing Commerce Environment.
Recommended post-deployment steps
For information on recommended post-deployment steps, see Commerce Post Deployment Steps.