Troubleshooting Deployment of Elastic Path Commerce
Deployments
Access EC2 Instances In Private Subnets Using SSH and Bastion Server
For troubleshooting, you can access EC2 instances inside private subnets using the Bastion server and SSH, if required.
Locate the
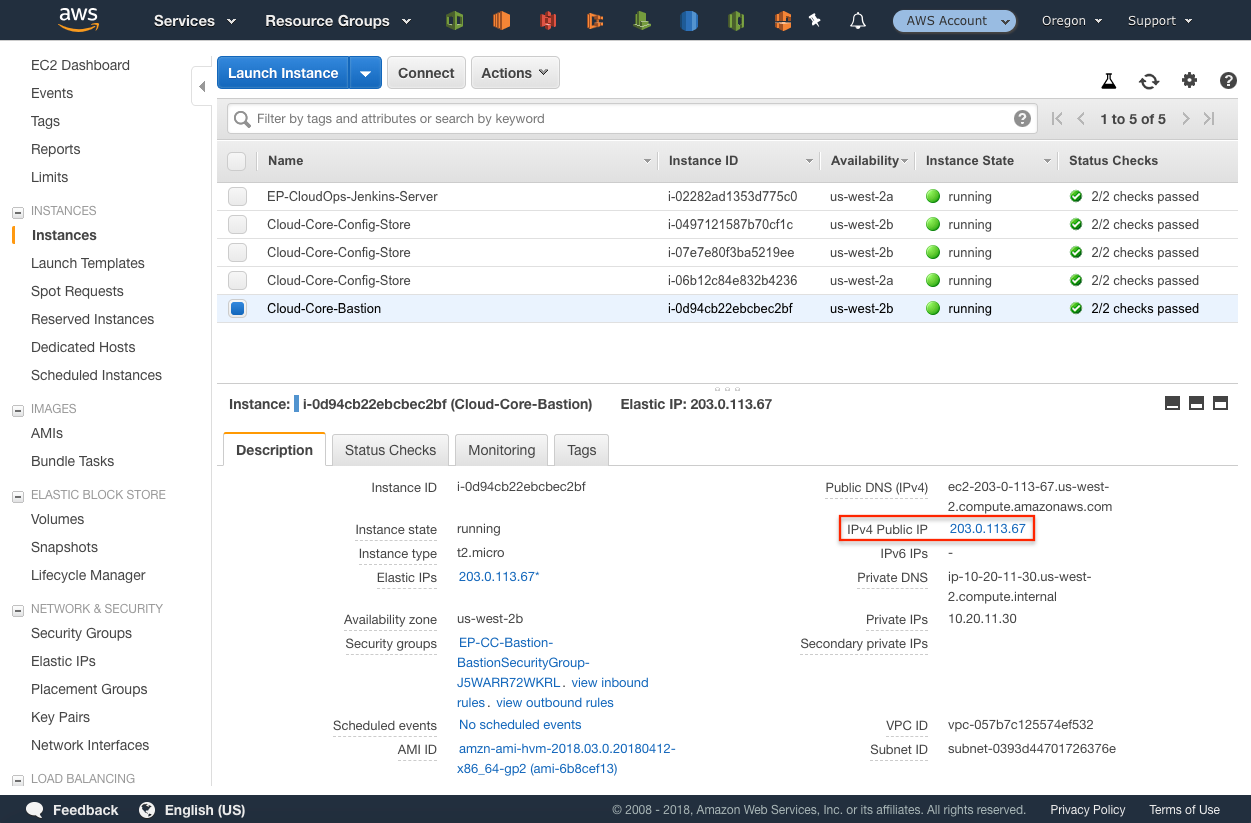
ep-bastionSSH key that has access to the Bastion server. This key is created during the CloudCore initialization and is stored in the same directory as the CloudCore bootstrap script.Locate the public IP address of the Bastion server. Find this information in the AWS EC2 console as shown in the following figure:

To access the Bastion server, run the following command:
ssh -i /path/to/ep-bastion ec2-user@203.0.113.67Connect to the EC2 instances using the private IP addresses. You can find private IP addresses of EC2 instances in the AWS EC2 console. For example:
ssh ec2-user@10.20.12.159
Can I host multiple environments, such Production, QA, or Staging, in the same AWS account?
As of CloudDeploy 3.1.0, deployment of multiple Author and Live environments in a single AWS (Amazon Web Services) account is now supported.
To maintain a secure production environment, use an AWS account that is separate from the one used for the QA and staging environment. For more information, see Multiple Accounts for Different Environments
How can I deploy a single instance environment to different AWS regions?
You cannot deploy a single initialization of CloudOps into multiple regions. You must create separate accounts for each region that you want to deploy to. For more information on multiple accounts, see Multiple Accounts for Different Environments.
Can I change the EC2 instance size for deployments?
Elastic Path recommends not to alter the instance size for deployments. The autoscaling rules for Cortex are configured to work with c5.xlarge instances, and the rules might not work with different instance sizes. If you increase the instance size, the rules for scaling the host checks the instance size before allocating additional host. If you increase the size of the instance, the scaling rule assumes that the instance is configured with sufficient resources and does not allocate additional host. If there is no empty instance with sufficient resources, the service fails to scale out.
You can change the instance class if the memory and CPU units are the same. For example, you can modify the instance size for the Cortex Autoscaling group to use c4.xlarge instances instead of c5.xlarge.
The instance type is exposed as a parameter named LiveInstanceType on the top level Author and Live CloudFormation template Create-Author-And-Live-Environment.yaml. It is not set during deployment and defaults to c5.xlarge, but can be set to c4.xlarge if required.
Docker container Issues
Why do my containers keep restarting?
ECS (Elastic Container Service) restarts all containers if a critical container is unstable. A container might be deemed unstable if it doesn’t start correctly, quits unexpectedly, or does not eventually respond to health checks.
Do the following to address this issue:
- Check the Elastic Path logs in CloudWatch to ensure that the Elastic Path applications are functioning as required
- Troubleshoot ECS. For more information, see Amazon ECS Troubleshooting
How do I resolve Error: Could not find or load main class 10.xx.xx.xx?
This error is displayed when multiple IP addresses are passed to the java.rmi.server.hostname Java property. The second IP address is not correctly parsed and an error message Error: Could not find or load main class 10.xx.xx.xx appears in the docker log.
Elastic Path recommends keeping the default value, $(hostname -i), which passes one IP address.
In CloudOps, the java.rmi.server.hostname property is set by the setenv.sh script, which can be found in the Elastic Path Docker repository.
How can I connect a Java profiler to an Elastic Path Commerce web app running in ECS
To connect to a Java process that is running inside a Docker container in ECS:
Deploy an Elastic Path Commerce environment with the
ENABLE_JMXenvironment variable set totrue.By default, JMX is enabled in all deployments by our CloudOps Configuration Sets.
(Optional) Configure JMX user and password authentication.
Note: This step is not required for deployment, but is enabled by default for Authoring and Live deployments.
Single-instance deployments
(Optional) To enable JMX user and password authentication for a single-instance deployment, edit the CloudOps Configuration set used for the deployment. Set the environment variable
JMX_AUTHtotrueand setJMX_USERandJMX_PASSWORDto the username and password for the JMX authentication.Authoring and Live deployments
JMX user and password authentication is enabled in default Authoring and Live CloudOps Configuration Sets.
The user and password are set in the Jenkins job
DeployAuthorAndLiveby the following parameters:LIVE_JMX_USERLIVE_JMX_PASSWORDAUTHOR_JMX_USERAUTHOR_JMX_PASSWORD
If the parameters are empty, the job generates random values. The job also uploads the values to the configuration store. Find the values in the configuration store under the key:
deploy/ep/config/v1/envs/<cloudformation-stack-name>/<authoring or live>/
Find the port on the host EC2 instance that is mapped to the JMX port on the container you are trying to access. For more information, see Port Mappings.
Copy the ep-ec2 SSH key to your local workstation. This key can be copied from the bastion instance from the path
/home/ec2-user/.ssh/ep-ec2.Open an SSH tunnel through the bastion instance and to the host of the container you which to access.
Map port
8888on your local machine to the port on the host machine from step 3 that the container’s JMX port is mapped to.For example:
ssh -t -o "ProxyCommand=ssh ec2-user@${bastionPublicIp} -i ~/.ssh/ep-bastion -W %h:%p" \
    -N -v ec2-user@${containerHostPrivateIP} -i ~/.ssh/ep-ec2 \
    -L 8888:${containerHostPrivateIP}:${containerHostJmxPort}
Open a connection using your Java profiler of choice.
If JMX authentication is disabled, run the following commands to connect directly to JMX. You may need to to accept an unsecured connection pop up warning.
- For JConsole, run the command
jconsole localhost:8888 - For JVisualVM, run the command
jvisualvm --openjmx 127.0.0.1:8888
If JMX authentication is enabled, run the Java profiler of choice and connect using the UI providing the correct username and password from step 2
- For JConsole, run the command
Note: Make sure to disable ENABLE_JMX on production environments to avoid performance issues.