
State Policies
Introduction to State Policies
State Policy is a set of rules that can be used to determine the state of widgets. UI widgets in the Commerce Manager can have one of three states:
editable- the user can view and modify the value displayed in the widgetread-only- the user can only view the valuedisabled- the widget is disabled and the user cannot view or modify the value
The state of a widget at a given time depends on several factors. For example, if a text widget displays product data:
- Only the users who are assigned to a catalog that contains that product can see the value.
- Only the users with the Manage Products and SKUs permission can modify that value.
If the Change Sets feature is enabled and that product is in a locked change set, only users who are assigned to the change set can see that value.
Managing the states of different widgets can become very complex when you have many controls displaying data from different sources in the same dialog. State Policies provide a way to manage the state of UI widgets in the Commerce Manager.
To understand how state policies work, it’s important to understand the different objects that interact with them.
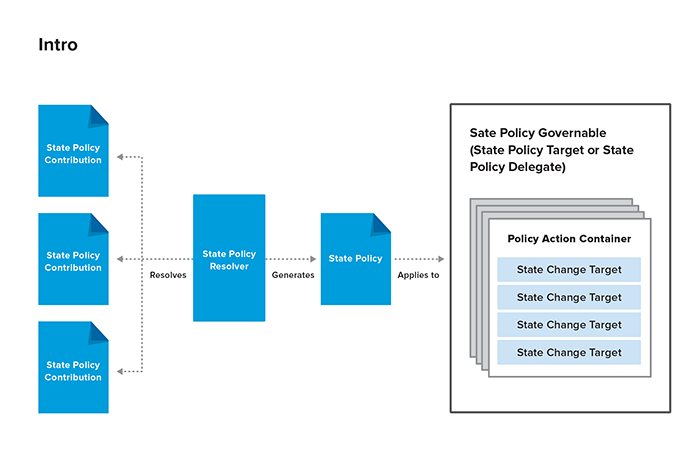
State Policy Contribution
Maps a State Policy Target to a State Policy. There may be multiple State Policies that apply to a given State Policy Target.
For example, there may be one State Policy governing access to data from a particular catalog. There may also be a State Policy governing access to objects in a particular Change Sets. In this case, the rules of both State Policies need to be applied.
State Policy Resolver
Resolves the State Policy Contributions and creates a single State Policy that can be applied to State Policy Targets.
State Policy Governable
An object that can have a State Policy applied to it. For example:
- A Dialog
- A Wizard
- A Page
- An Editor
There are two types of Governable:
- State Policy Target
- State Policy Delegate
State Policy Target
A State Policy Governable that receives its State Policy through a direct assignment. Dialogs, Editors, and Actions are examples of State Policy Targets.
State Policy Delegate
A State Policy Governable that inherits its State Policy from its container. Pages and Sections are examples of State Policy Delegates.
State Policy Governable contains one or more Policy Action Containers.
Policy Action Container
Contains State Change Targets.
State Change Target
A UI control whose state may change depending on different factors.
Creating a State Policy
Custom State Policies should extend the AbstractStatePolicyImpl class and implement the init and determineState methods.
The State Policy is initialized by calling the init method. This method takes a bean factory and an Object as parameters. The bean factory parameter can be used to set a custom bean factory. The dependentObject parameter is an optional dependent object, usually the model (domain object) containing the data to be displayed in the control. Use the dependentObject parameter to pass any objects you need to determine state.
note
If you need to pass multiple objects to the state policy, add the objects to a Collection and pass the Collection in the dependentObject parameter.
The following example shows the init method for a policy that determines the state of UI controls when creating a category in a catalog. In this case, the dependentObject parameter contains a Catalog object.
public void init(final BeanFactory beanFactory, final Object dependentObject) {
    this.catalog = (Catalog) dependentObject;
}
The determineState method contains the logic you want to apply to determine the state of the UI control. The PolicyActionContainer parameter contains the State Policy Governables to which the Policy is being applied and the State Change Targets that will be affected.
The following example shows the determineState method for a policy that determines the state of UI controls when creating a category in a catalog. If the user has the category management permission and the user has been assigned to that catalog, then determineState returns EpState.EDITABLE, which means the UI controls will be editable. Otherwise, the UI controls will be read-only.
public EpState determineState(final PolicyActionContainer targetContainer) {
    if (this.catalog != null
            && AuthorizationService.getInstance().isAuthorized(CatalogPermissions.CATEGORY_MANAGE)
            && AuthorizationService.getInstance().isAuthorized(this.catalog)) {
        return EpState.EDITABLE;
    }
    return EpState.READ_ONLY;
}
Enabling State Policy awareness in a UI plugin
A UI Plugin’s Dialogs, Editors, Wizards, and Actions can all be made state policies aware. The basic process for this is as follows:
- Create a State Policy extension point and add it to the
plugin.xmlof the plugin that needs to support State Policies. - Create a State Policy aware UI plugin class.
- Create a State Policy aware dialog and a State Policy aware action.
- In your dialogs, add a State Policy aware UI controls.
- Create a State Policy Contribution to map your State Policies to State Policy Targets.
Creating a State Policy extension point
In order to create a State Policy Contribution, you must add a State Policy extension point to the plugin.
To create a State Policy extension point for a plugin, do the following:
Open
plugin.xmlin Eclipse.In the Extension Points tab, click the Add button next to the All Extension Points list.
In the New Extension Point dialog, enter the following:
- Extension Point ID
- Extension Point Name
- Extension Point Schema: Leave blank and make sure Edit extension point schema when done is selected
Click Finish
A new schema file named
statePolicy.exsdis created and is displayed automatically.In the Source tab of the
statePolicy.exsdfile, paste the following:
<?xml version='1.0' encoding='UTF-8'?>
<!-- Schema file written by PDE -->
<schema targetNamespace="com.elasticpath.cmclient.admin.gc" xmlns="http://www.w3.org/2001/XMLSchema">
<element name="extension">
  <complexType>
    <sequence minOccurs="1" maxOccurs="unbounded">
      <element ref="statePolicyContribution"/>
    </sequence>
    <attribute name="point" type="string" use="required"/>
  </complexType>
</element>
<element name="statePolicyContribution">
  <complexType>
    <attribute name="targetId" type="string" use="required">
      <annotation>
        <documentation>The target of the given policy</documentation>
      </annotation>
    </attribute>
    <attribute name="statePolicy" type="string" use="required">
      <annotation>
        <documentation>The state policy that is being contributed</documentation>
        <appInfo><meta.attribute kind="java" basedOn=":com.elasticpath.cmclient.policy.StatePolicy"/></appInfo>
      </annotation>
    </attribute>
    <attribute name="priority" type="string" use="required">
      <annotation>
        <documentation>The priority of the contributed policy.
This is used by a policy resolver to combine contributed policies.</documentation>
      </annotation>
    </attribute>
  </complexType>
</element>
</schema>
Creating a State Policy aware UI plugin class
note
You must add the com.elasticpath.cmclient.policy plugin to the Required Plug-ins list in your plugin’s Dependencies.
UI plugins that need State Policies support must extend AbstractPolicyAwareUIPlugin. Only one method must be implemented: getPluginId().
The plugin ID provided is used by the State Policy Extension Retriever to get state policies from the plugin extension point. It is responsible for ensuring that the State Policy Contributions from the Change Set plugin are included when the Change Sets feature is enabled. (If the Change Sets feature is disabled, the state policy contributions from the Change Set plugin are ignored.)
The State Policy Resolver is responsible for merging all State Policy Contributions into a single State Policy that can be applied to the relevant State Policy Targets.
AbstractPolicyAwareUIPlugin.getStatePolicyResolver() returns a default PriorityStatePolicyResolver object. PriorityStatePolicyResolver uses the priority of the State Policy Contributions to determine which rules take precedence (highest priority wins). If two policies have the same priority, the policies will be combined with a logical AND to determine editability.
note
A plugin which is State Policy aware can choose to use its own resolver, or request the default one from the Policy plugin. To use a different resolver as the default, modify the extension in the Policy plugin’s statePolicyResolver extension point.
Creating a State Policy aware dialog
Before You Begin
Make sure that you have created a State Policy extension point in the plugin.
For a Commerce Manager dialog to be State Policies aware, it must extend AbstractPolicyAwareDialog and implement ObjectGuidReceiver.
The dialog must also have a zero-parameter constructor and must be able to perform all persistence operations (retrieve, update, save, etc.) by itself.
The following methods must be implemented:
getTargetIdentifiersetObjectGuidcreateDialogContentgetOkButtonPolicyActionContainerrefreshLayout
getTargetIdentifier
Must return the unique identifier that will be used to map State Policy Contribution to this object.
//com.elasticpath.cmclient.catalog/src/main/java/com/elasticpath/cmclient/catalog/dialogs/catalog/VirtualCatalogDialog.java
public String getTargetIdentifier() {
    if (this.virtualCatalog.isPersisted()) {
        return "virtualCatalogDialogTarget"; //$NON-NLS-1$
    }
    return "virualCatalogDialogEditableTarget"; //$NON-NLS-1$
}
setObjectGuid
Must be implemented to retrieve the dialog’s dependent object from its GUID.
//com.elasticpath.cmclient.catalog/src/main/java/com/elasticpath/cmclient/catalog/dialogs/catalog/VirtualCatalogDialog.java
public void setObjectGuid(final String objectGuid) {
    if (objectGuid == null) {
        virtualCatalog = getBeanFactory().getBean(ContextIdNames.CATALOG);
        virtualCatalog.setMaster(false);
    } else {
        virtualCatalog = catalogService.findByCode(objectGuid);
        if (virtualCatalog == null) {
            throw new IllegalArgumentException(
                    NLS.bind(CoreMessages.Given_Object_Not_Exist, new String[] {"Virtual Catalog", objectGuid})); //$NON-NLS-1$
        }
    }
}
createDialogContent
It is responsible for creating and laying out the dialog’s UI controls.
The first step is usually to add a Policy Action Container. Then use the IPolicyTargetLayoutComposite's add methods to add UI controls. These methods take the PolicyActionContainer object as their final argument. This ensures that a StateChangeTarget is added to the PolicyActionContainer for each UI control that is added to the dialog.
//com.elasticpath.cmclient.catalog/src/main/java/com/elasticpath/cmclient/catalog/dialogs/catalog/VirtualCatalogDialog.java
protected void createDialogContent(final IPolicyTargetLayoutComposite dialogComposite) {

    // This name does not need to match anything necessarily
    readOnlyVirtualCatalogPolicyContainer = addPolicyActionContainer("readOnlyVirtualCatalogDialog"); //$NON-NLS-1$
    editableVirtualCatalogPolicyContainer = addPolicyActionContainer("virtualCatalogDialog"); //$NON-NLS-1$

    mainPolicyComposite = dialogComposite
            .addGridLayoutComposite(2, false, dialogComposite
                    .createLayoutData(IEpLayoutData.FILL, IEpLayoutData.BEGINNING, true, false),
                                      editableVirtualCatalogPolicyContainer);

    final IEpLayoutData mainCompositeFieldData = mainPolicyComposite
            .createLayoutData(IEpLayoutData.FILL, IEpLayoutData.BEGINNING, true, true);
    final IEpLayoutData mainCompositeLabelData = mainPolicyComposite
            .createLayoutData(IEpLayoutData.BEGINNING, IEpLayoutData.BEGINNING, false, true);

    if (isVirtualCatalogPersistent()) {
        mainPolicyComposite.addLabelBold(CatalogMessages.CatalogSummarySection_CatalogCode,
                                         mainCompositeLabelData, readOnlyVirtualCatalogPolicyContainer);

        this.catalogCode = mainPolicyComposite.addTextField(mainCompositeFieldData, readOnlyVirtualCatalogPolicyContainer);
    } else {
        mainPolicyComposite.addLabelBoldRequired(CatalogMessages.CatalogSummarySection_CatalogCode,
                                                 mainCompositeLabelData, editableVirtualCatalogPolicyContainer);
        this.catalogCode = mainPolicyComposite.addTextField(mainCompositeFieldData, editableVirtualCatalogPolicyContainer);
    }
}
getOkButtonPolicyActionContainer
Returns the Policy Action Container that will control the state of the dialog’s OK or Save button.
//com.elasticpath.cmclient.catalog/src/main/java/com/elasticpath/cmclient/catalog/dialogs/catalog/VirtualCatalogDialog.java
protected PolicyActionContainer getOkButtonPolicyActionContainer() {
    return this.editableVirtualCatalogPolicyContainer;
}
refreshLayout
Can be implemented to refresh the layout of parent composites if required.
//com.elasticpath.cmclient.catalog/src/main/java/com/elasticpath/cmclient/catalog/dialogs/catalog/VirtualCatalogDialog.java
protected void refreshLayout() {
    if (mainPolicyComposite != null) {
        mainPolicyComposite.getSwtComposite().layout();
        mainPolicyComposite.getSwtComposite().getParent().layout();
    }
}
Registering the dialog for Change Sets
In order to edit an object from within a Change Sets editor, its dialog must be registered as a Change Set supported component. To do this, edit the plugin’s plugin.xml and add a supportedComponents extension point (if one doesn’t already exist). Inside the extension point, add a dialog element with a class attribute set to the name of your dialog class and an objectType attribute containing a display name for the dialog.
The following example shows the registration for com.elasticpath.cmclient.catalog.dialogs.catalog.VirtualCatalogDialog.
<extension point="com.elasticpath.cmclient.changeset.supportedComponents">
    ...
    <dialog
        class="com.elasticpath.cmclient.catalog.dialogs.catalog.VirtualCatalogDialog"
        objectType="Catalog">
    </dialog>
</extension>
Creating a State Policy aware action
Before You Begin
Make sure that you have Creating a State Policy extension point in the plugin.
For a Commerce Manager action to be State Policies aware, it must extend AbstractPolicyAwareAction.
The getTargetIdentifier method must be implemented to return the unique identifier that will be used to map Creating a State Policy Contribution to this target.
public String getTargetIdentifier() {
    return targetIdentifier;
}
Adding State Policy aware UI controls
Use the IPolicyTargetLayoutComposite's add methods to add State Policies aware UI controls. These methods take a PolicyActionContainer object as their final parameter. This ensures that a StateChangeTarget is added to the PolicyActionContainer for each UI control that is added to the composite
If you are Creating a State Policy aware dialog, use the IPolicyTargetLayoutComposite in the createDialogContent method. Otherwise, use the PolicyTargetCompositeFactory to get an IPolicyTargetLayoutComposite instance.
final PolicyActionContainer myPolicyContainer = addPolicyActionContainer("myPolicyContainer"); //$NON-NLS-1$

// Create a grid layout composite
final IEpLayoutComposite gridLayoutComposite =
        CompositeFactory.createGridWrapLayoutComposite(parent, 2, false);

// Wrap it in a State Policy aware layout composite
final IPolicyTargetLayoutComposite policyComposite =
        PolicyTargetCompositeFactory.wrapLayoutComposite(gridLayoutComposite);

// Add UI controls
policyComposite.addLabelBoldRequired("Label", labelData, myPolicyContainer);
policyComposite.addTextField(fieldData, myPolicyContainer);
Creating a State Policy Contribution
Each State Policy aware dialog, editor, section, page, and action must be mapped to a State Policies through a State Policy Contribution.
Before You Begin
Make sure that you have created a State Policy extension point in the plugin.
A State Policy should live in the plugin most appropriate for the code that the policy is using to determine state. For example, all State Policies relating to Change Sets are in the com.elasticpath.cmclient.changeset plugin. Multiple plugins can contribute policies to a particular StatePolicyTarget. The extension point framework enables this without any dependency coupling between plugins.
In the Commerce Manager plugin’s plugin.xml file, add a statePolicyContribution element for each StatePolicyTarget that you need to map to a State Policy.
The following list shows the attributes that must be configured on the statePolicyContribution.
targetIdThe target id of the
statePolicyTargetobject as returned by it’sgetTargetIdentifiermethod.statePolicyThe fully qualified class name of the State Policy.
priorityThe priority. This value is used by the
StatePolicyResolverto determine the order in which State Policy Contributions are applied
A State Policy can be applied to multiple targets and multiple State Policies can apply to the same target. If there is a conflict between policies, the behavior is determined by the plugin’s State Policy aware UI plugin class. For the DefaultStatePolicyResolver, the contribution with the highest priority generally takes precedence.
The following example, shows State Policy Contributions mapped to a dialog, an action, and an editor.
<extension point="com.elasticpath.cmclient.catalog.statePolicy">
...
    <statePolicyContribution
         priority="10"
         statePolicy="com.elasticpath.cmclient.catalog.policy.EditVirtualCatalogAuthorizationStatePolicy"
         targetId="virualCatalogDialogEditableTarget">
    </statePolicyContribution>

    <statePolicyContribution
         priority="10"
         statePolicy="com.elasticpath.cmclient.catalog.policy.EditVirtualCatalogAuthorizationStatePolicy"
         targetId="editCatalogCategoryAction">
    </statePolicyContribution>

    <statePolicyContribution
        priority="10"
        statePolicy="com.elasticpath.cmclient.catalog.policy.CategoryAuthorizationStatePolicy"
        targetId="categoryEditor">
    </statePolicyContribution>
<extension>
Creating a State Policy aware editor
Before You Begin
Make sure that you have created a State Policy extension point in the plugin.
For a Commerce Manager editor to be State Policies aware, it must extend AbstractPolicyAwareFormEditor. The following methods must be implemented:
getTargetIdentifieraddPages
getTargetIdentifier
Must return the unique identifier that will be used to map a State Policy Contribution to this object.
public String getTargetIdentifier() {
    return "categoryEditor"; //$NON-NLS-1$
}
addPages
It is responsible for creating and adding the editor’s pages. Before adding pages, you need to add a Policy Action Container. Then use addPage to add pages to the editor.
addPage takes the PolicyActionContainer object as its second parameter. This ensures that StateChangeTarget objects are added to the PolicyActionContainer for the UI controls in each page that is added to the editor.
protected void addPages() {
    try {
        final PolicyActionContainer pageContainer = addPolicyActionContainer("categoryEditor"); //$NON-NLS-1$
        addPage(new CategorySummaryPage(this), pageContainer);
        addPage(new CategoryAttributePage(this), pageContainer);
        addPage(new CategorySeoPage(this), pageContainer);
        addPage(new CategoryFeaturedProductsPage(this), pageContainer);
    } catch (final PartInitException e) {
        throw new EpUiException(e);
    }
}
Use `IPolicyTargetComposite`
Make sure the pages use PolicyTargetCompositeFactory to create an IPolicyTargetComposite and use its add methods to State Policy aware UI controls.
Registering the editor for Change Sets
In order to edit an object from within a Change Sets, its editor must be registered as a Change Set supported component. To do this, edit the plugin’s plugin.xml and add a supportedComponents extension point (if one doesn’t already exist). Inside the extension point, add an editor element with an editorId attribute set to the name of your editor class and an objectType attribute containing a display name for the editor.
The following example shows the registration for com.elasticpath.cmclient.catalog.editors.category.CategoryEditor.
<extension point="com.elasticpath.cmclient.changeset.supportedComponents">
    ...
    <editor
        editorId="com.elasticpath.cmclient.catalog.editors.category.CategoryEditor"
        objectType="Category">
    </editor>
</extension>