Deployment to the Development Team Server
This page provides information on the Development Team Server and how to deploy Elastic Path applications to the server. The Development Team server has the simplest possible deployment topology:
- A local MySQL database
- A local ActiveMQ Java Message Service broker
- A single Tomcat instance running all web apps
If you are using Amazon Web Services, consider using Elastic Path CloudOps for AWS to automate your infrastructure setup and deployment. If you are using Kubernetes, consider using Elastic Path CloudOps for Kubernetes to automate your infrastructure setup and deployment.
The basic deployment component is:
- A deployment package that is built by the
extensions/packagermodule
You can deploy the same package to multiple environments without changes using a "Build once, deploy anywhere" approach.
Deployment Package
The deployment package contains:
- WAR files for all Elastic Path webapps
- Data and properties from the
extensions/databasemodule
Use these to update the database schema and catalog data.
- Tools - Data Population and Import and Export
- JAR files - Tomcat requirements for a database driver and Active MQ dependencies
- Tomcat installation package - If desired, install Tomcat
Deployment Process
This section shows an overview of the deployment process in the diagram below. Typically there are two continuous integration jobs, one to build a deployment package, and the second to push to the target environment.
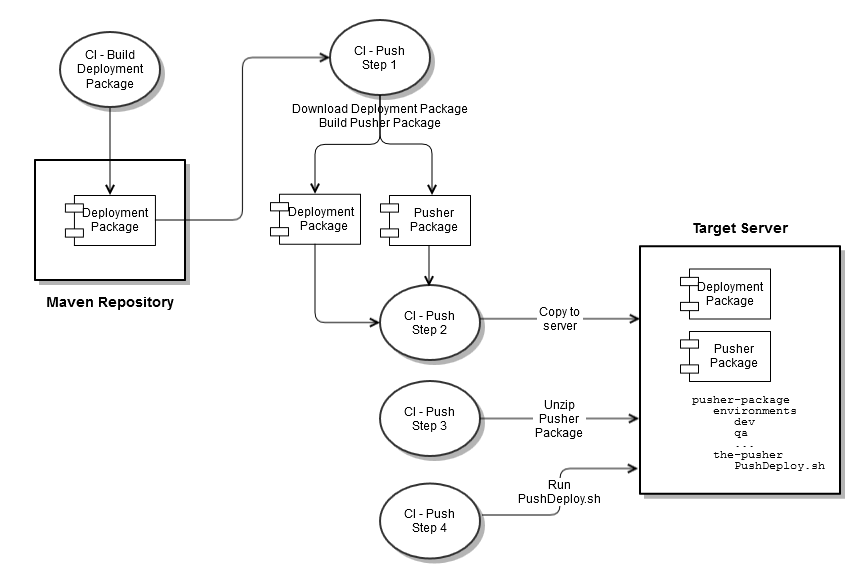
Configuring the Deployment Server
-
Verify the target server is configured as described in Prepare Infrastructure
-
Configure the
filtering.propertiesfile. The file is in theextensions/database/ext-data/src/main/resources/environments/dev/folder. The file is used for filtering of catalog data -
Configure the following files:
-
database.propertiesDefines database connection properties and the data population environment name itself for this environment.
-
data-population.propertiesDefines properties required by the Data Population tool for execution in this environment; e.g. Liquibase contexts to activate for this environment.
-
filtering.propertiesDefines the values used when overriding property placeholders in data files for this environment.|
-
Deploying to Development Team Server
This section provides instructions to deploy the Development Team Server. You can deploy to the Development Team server using the following continuous integration jobs that were created in the Setting up Continuous Integration Server section.
-
Run the Deployment Package job and wait for it to complete.
-
Run the Deploy to Dev Server job and wait for it to complete.
-
Run the smoke test for the deployment using the following URLs:
-
Cortex:
http://<hostname>:8080/cortex/statusCortex health monitor
-
Cortex Studio:
http://<hostname>:8080/studioFor access, expand the Authentication utility menu and click Revoke Access and Authenticate.
-
Commerce Manager:
http://<hostname>:8080/cm/?servicehandler=statusCommerce Manager health monitor.
-
Search Server:
http://<hostname>:8080/search/status/Search server health monitor.
-
Batch Server:
http://<hostname>:8080/batch/status/Batch server health monitor.
-
Integration Server:
http://<hostname>:8080/integration/status/Integration server health monitor.
-
Active MQ:
http://<hostname>:8161/adminActive MQ control panel
-