Setting up Developer Environment
Configuring Environment Variables
Use this procedure to set system environment variables for:
- Java:
JAVA_HOMEandJAVA_OPTS - Maven:
MAVEN_HOMEandMAVEN_OPTS - MySQL:
MYSQL_HOME
Windows
-
Open the Start menu, right-click My Computer and select Properties.
-
Click Advanced System Settings.
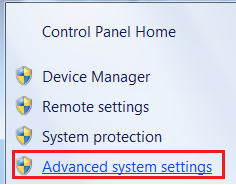
To quickly show the System Properties > Advanced > Environment Variables from the Windows Run prompt, type
SystemPropertiesAdvancedand press Enter. -
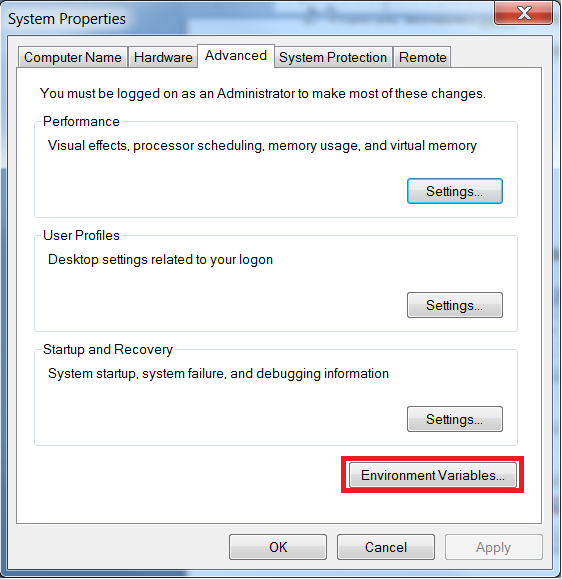
In the System Properties > Advanced, click Environment Variables.
-
To add a new system environment variable, on the Environment Variables window, click New.
-
Add the following:
JAVA_HOME:C:\Program Files\Zulu\zulu-8-amd64JAVA_OPTS:-Xmx1024m -Dsun.lang.ClassLoader.allowArraySyntax=trueMAVEN_HOME:C:\apache-maven-3.6.2MAVEN_OPTS:-Xmx2048m -XX:ReservedCodeCacheSize=128m -Dsun.lang.ClassLoader.allowArraySyntax=trueMYSQL_HOME:C:\MySQL\MySQL Server 5.7
The values for
JAVA_HOME,MAVEN_HOME, andMYSQL_HOMEvariables depend on the location where Java, Maven, and MySQL are installed. This location might differ from the default values provided. -
Select the
Pathsystem variable, and click Edit. -
Add the following variables at the end of the
Pathvariable:;%JAVA_HOME%\bin;%MAVEN_HOME%\bin;%MYSQL_HOME%\bin;
Linux
To set the system variables on Linux, modify your .bash_profile in your home folder as shown in this example.
# .bash_profile
# Get the aliases and functions
if [ -f ~/.bashrc ]; then
        . ~/.bashrc
fi
# User specific environment and startup programs
PATH=$PATH:$HOME/bin
export PATH
JAVA_HOME=/home/USERNAME/tools/zulu-8-amd64/
export JAVA_HOME
JAVA_OPTS='-Xmx1024m -Dsun.lang.ClassLoader.allowArraySyntax=true'
export JAVA_OPTS
MAVEN_HOME=/home/USERNAME/tools/apache-maven-3.6.2
export MAVEN_HOME
MAVEN_OPTS='-Xmx2048m -XX:ReservedCodeCacheSize=128m -Dsun.lang.ClassLoader.allowArraySyntax=true'
export MAVEN_OPTS
PATH=$PATH:$JAVA_HOME/bin:$MAVEN_HOME/bin
export PATH
MacOS
-
Open a terminal window and determine the location of your Zulu installation as follows:
$ /usr/libexec/java_home -V11.0.1, x86_64: "Java SE 11.0.1" /Library/Java/JavaVirtualMachines/jdk-11.0.1.jdk/Contents/Home1.8.0_202-zulu-8.36.0.1, x86_64: "Zulu 8" /Library/Java/JavaVirtualMachines/zulu-8.jdk/Contents/Home -
Modify your
.bash_profile(if using Bash shell) or.zshrc(if using zsh shell) in your home folder to set the required environment variables.export JAVA_HOME="/Library/Java/JavaVirtualMachines/zulu-8.jdk/Contents/Home"export JAVA_OPTS="-Xmx1024m -Dsun.lang.ClassLoader.allowArraySyntax=true"export MAVEN_HOME="/Users/gartner/Downloads/apache-maven-3.6.2"export MAVEN_OPTS="-Xmx2048m -XX:ReservedCodeCacheSize=128m -Dsun.lang.ClassLoader.allowArraySyntax=true"export PATH=$PATH:$JAVA_HOME/bin:$MAVEN_HOME/bin -
Open a new terminal window and verify the installation as follows:
$ java -versionopenjdk version "1.8.0_252"OpenJDK Runtime Environment (Zulu 8.46.0.19-CA-macosx) (build 1.8.0_252-b14)OpenJDK 64-Bit Server VM (Zulu 8.46.0.19-CA-macosx) (build 25.252-b14, mixed mode)$ mvn -versionApache Maven 3.5.4 (1edded0938998edf8bf061f1ceb3cfdeccf443fe; 2018-06-17T11:33:14-07:00)Maven home: /Users/gdenning/apache-maven-3.5.4Java version: 1.8.0_252, vendor: Azul Systems, Inc., runtime: /Library/Java/JavaVirtualMachines/zulu-8.jdk/Contents/Home/jreDefault locale: en_CA, platform encoding: UTF-8OS name: "mac os x", version: "10.15.4", arch: "x86_64", family: "mac"
Building Source Code
Checkout Source Code
Do not save your source project to a directory if the file path is greater than 20 characters. Windows file paths are limited to 260 characters. The longest file path in the source code is greater than 230 characters.
To checkout a local copy of the Elastic Path source code from your source control repository:
- Create a folder to save the Elastic Path source.
- Checkout the Self-Managed Commerce code from the source control repository to your local source folder.
Configure Maven settings.xml
Before you build the source code, create a local Maven directory and update the settings.xml file.
-
Create an
.m2directory in your local user directory. Example:> mkdir C:\Users\<YourWindowsUser>\.m2 -
Copy the
settings.xmlfile from the branch location../extensions/mavento your local directory.m2. -
Edit the following values in the
settings.xmlfile to match your local developer environment.Setting Description epdb.reset_userMaven Profile: mysql-dev-db. The database account with administrative permissions that can drop and create databases and users in your local database.epdb.reset_passwordMaven Profile: mysql-dev-db. The password forepdb.reset_user.ep.local.asset.pathThe path to your local /extensions/assets/ext-assets/src/main/assetssource directory.ep.smtp.hostYour SMTP Server. internet-mirrorThe URL of your organization’s Nexus server. Verify that the URL is already set. If not, contact the person who set up the team environment. For more information, see Configure the Maven Settings for the Team. warningIf these property values do not exist in the
settings.xmlfile, the source code might not be following the guidelines at Setup Guide, and you cannot build and deploy the Elastic Path Web Applications.
Build All Projects
You can build all projects with one Maven command.
-
Open the command line and navigate to the Self-Managed Commerce source directory.
-
Run the following Maven command:
mvn clean install -DskipAllTestsWith the
-DskipAllTestscommand, the system does not run any unit test or integration tests, however the system still builds the test. For more details on the Maven arguments, see Elastic Path Maven Commands.
Build Individual Modules
You can also build each module in Elastic Path separately, if required. However, you cannot build the individual modules unless you build the Self-Managed Commerce source directory at least once. When you build the Self-Managed Commerce modules separately, you must follow the following order:
commerce-datacommerce-enginehealth-monitoringcommerce-managercortex-resourcesextensions
For example, when you build the commerce-manager module, you must first build the commerce-data and commerce-engine modules separately.
To build a modules individually, in the command line, navigate to the Self-Managed Commerce source directory.
-
Navigate to the project/module that you want to build.
-
Enter the following Maven command:
mvn clean install -DskipAllTestsWith the
-DskipAllTestscommand, the system does not run any unit test or integration tests, however the system still builds the test. For more details on the Maven arguments, see Elastic Path Maven Commands